
When making a game highlight video, getting just the music and sound effects right can completely transform the mood. But once you start, two things tend to trip you up. One is "Can I even use this music without copyright issues?" and the other is "I added music, but it feels disconnected from the video." This article tackles those two problems in order. Bottom line, the work is four steps: pick a copyright-safe free track, insert it into your video, sync your cuts to the music's beat, and balance the volume between game audio and music. Stick to this order and anyone can produce a result that doesn't feel awkward.
Step 1: Pick a Copyright-Safe Free Track
The first thing to do isn't finding a song you like, but finding a song you're allowed to use. For a video you'll upload to YouTube or social media, you can't just drop in any song. If you use a commercial track as-is, a copyright claim (Content ID) can be filed, sending your revenue to the rights holder or getting your video blocked. So the starting point is to pick from "royalty-free" or "Creative Commons" music, that is, tracks for which permission to use is already open.
The safest and most accessible place is the Audio Library inside YouTube Studio. After logging into YouTube Studio, go to the Audio Library from the left menu, where you can download free background music (BGM) and sound effects provided directly by YouTube. These tracks are copyright-safe for use in YouTube videos and can be used in monetized videos too. You can filter by genre, mood, and length, making it easy to quickly find a song that fits your game video's tone.
Beyond the YouTube Audio Library, there are several other safe sources of free music. Compare and download tracks that match your video's tone.
- YouTube Studio Audio Library: Provides free BGM and sound effects you can use as-is in YouTube videos. Downloads are only available from within YouTube Studio.
- Pixabay Music: Has plenty of free tracks you can download without even signing up, and a wide variety of beat-driven tracks that suit game highlights.
- Creative Commons (CC) music: Free to use, but depending on the license type, it may require attribution (credit) or carry a non-commercial restriction, so be sure to check the license terms for each track.
- Audio you make yourself: Sound effects or music you record or create yourself belong to you, making them the safest option.
Step 2: Insert the Audio Into Your Video
Once you've picked your track, it's time to lay it onto the video. Most editing tools use a "timeline" structure. There's a separate audio track below the video track, and you insert the music by dragging your downloaded audio file onto that audio track. The important thing here is not to overwrite the game audio with the music, but to separate the game audio track and the music track and place them side by side. That way you can adjust the volume of each one separately later.
The music needs to be trimmed to the video's length. If the song is longer than the video, cut off the end; if the video is longer than the song, loop the song or splice in another section. Cutting a song off abruptly sounds awkward, so apply a fade out (an effect where the sound gradually gets quieter) at the end to wrap it up naturally. Adding a short fade in at the start too reduces the feeling of music suddenly jumping in.
Sound Effects Go on the 'Moment'
If background music is the floor that runs under the entire video, sound effects are the seasoning that emphasizes a specific moment. Laying a short "whoosh" or "boom" onto the moment a Valorant ace completes or a League of Legends pentakill goes off makes that scene pop. The key is to place sound effects on a separate audio track from the background music, lined up exactly to that frame.
Step 3: Sync Your Cuts to the Beat
If you've added music but the video feels disconnected, it's almost always a case of missing "beat sync." Beat sync means matching your cut transitions or great moments to the points where the music's beat drops. The human eye and ear feel something is "well made" when the rhythm of the sound and the change on screen happen at the same time. Even with the same clips, matching cuts to the beat creates a sense of rhythm that looks far more professional.
The method is simple. First, listen to the music and mark the points where the beat drops hard on your timeline. Then drag your video's cut transitions or kill moments onto those marked points. For example, you'd cut so the screen transitions to the next kill right as the music drops with a "boom." Place intense teamfight sections in the fast-beat parts and the calm intro in the slow-beat parts, and the video and music move as one.
Step 4: Volume Balance Between Game Audio and Music
The last step, and the one beginners most often get wrong, is volume balance. If you lay the music too loud, the game's own sounds, like gunfire, ability sounds, and kill notifications, get buried; conversely, if the music is too quiet, the mood doesn't come through. The basic principle is to keep the game audio as the lead and lay the music underneath as a backdrop that supports the mood.
Here's a concrete starting point. Set the game audio (gunfire, abilities, kill sounds) as your reference volume, and lay the background music one notch below it. Play the video from start to finish once and use your ears to check that important game sounds aren't buried under the music. At the decisive moment (when an ace completes), briefly dipping the music slightly and raising the game audio makes the impact of that moment land even harder.
Laying Music Onto Clips Directly in the DOR Editor
That's the general editing order, but if you limit it to game videos, there's an even simpler path. DOR automatically detects great moments like kills, aces, and pentakills in games like Valorant and League of Legends, and cuts them into short clips. So instead of scrubbing through long source footage to find sections, you can start editing right away from the already-cut highlight clips.
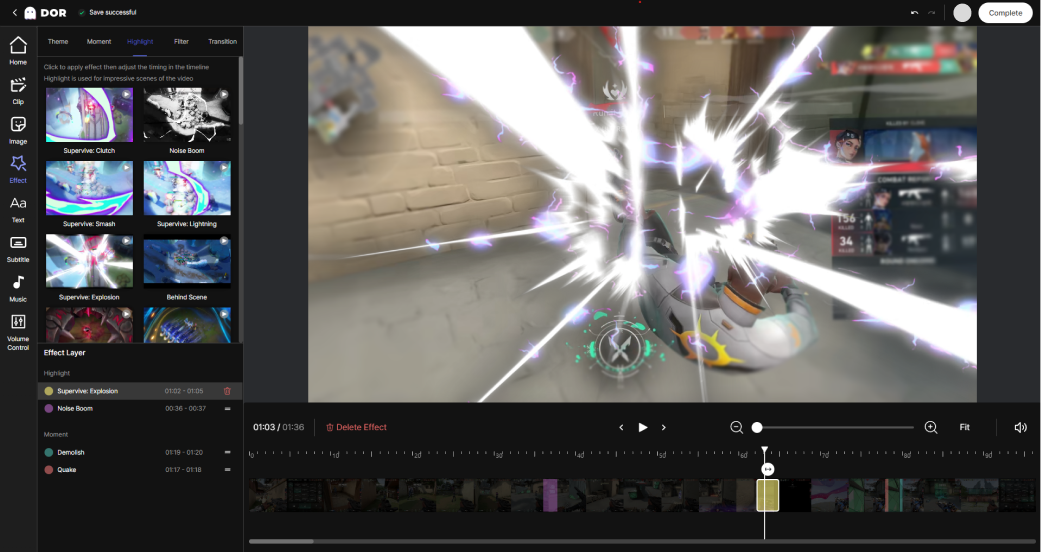
In the DOR editor, you can lay music directly onto automatically cut clips and balance the volume between game audio and music on one screen, then export right away. There's no need to install a separate editing program, move files over, and re-import them. Pick a highlight clip, lay on the music, adjust the game audio and music volume, then hit export, and a video file with the music baked in comes right out. It's free and watermark-free, so you can upload the result straight to YouTube or Shorts.
To sum up, the flow is this. DOR automatically collects great moments as clips while you play, you open those clips in the DOR editor, lay on copyright-safe music, fine-tune to the beat, and export with the game audio and music volume balanced. From picking a track to exporting, it all finishes in one place, so even someone who kept putting off adding music because it felt daunting can start right away. Check out auto-clip examples on the page for a game you play often, Valorant, League of Legends.

