
Let's start with the conclusion: the most intense moment in any game video is that split second when the kill lands. Stretch this moment into slow motion and speed through the parts before and after, and the same scene becomes several times more impactful. There is one prerequisite, though: to create smooth slow motion, your original footage has to be recorded at a high frame rate of 60fps or higher. You need enough frames so that the footage flows smoothly without stuttering when it is stretched out.
This article walks you through editing a kill scene into slow motion, step by step, from selecting the range to adjusting the speed. The flow is the same no matter which tool you use.
Why stretch only the kill moment into slow motion
Slow motion is an edit that plays footage back slower than it was captured (recorded). As each individual frame lingers on screen longer, you get the effect of time being stretched out. When you apply this to the kill moment in a game video, it gives the viewer enough time to savor the scene. It captures and shows off the key moment that would otherwise flash by, like the instant a headshot lands or an ultimate connects.
There is one more technique here. You deliberately speed through the parts before and after the kill at around 1.5x to 2x. When fast and slow sections form a contrast, the moment the slow motion kicks in stands out far more. This is especially effective in continuous fights, like an ace in Valorant or a pentakill in League of Legends.
Step 1: Select the range to slow down
First, decide which part of the whole clip you want to stretch. If you get greedy and slow down the entire fight, it drags and gets boring. What you actually want to emphasize is the one to two seconds around the finishing blow. Cut and select exactly that range.
- Using the frame where the kill is confirmed as your anchor, set the range to include about half a second before and after.
- Split (cut) the start and end points of that range on the timeline to make it an independent clip.
- Leave the parts before and after separate, and keep only the middle slow section selected.
Step 2: Apply slow motion by adjusting speed
Lower the speed value on the selected range to apply slow motion. Most editing tools have a speed slider or a playback-rate input field. 0.5x is a smooth half-speed slow, while 0.25x is a strong quarter-speed slow.
- Lower the speed of the selected kill range to 0.5x for half speed.
- If you need more dramatic emphasis, drop it all the way to 0.25x to hold the finishing blow a beat longer.
- Raise the parts before and after the kill to 1.5x to 2x to speed through them and create contrast.
- Play it back and fine-tune the length and speed of the slow section.
If the footage stutters when you slow it down, that is not an editing problem; it is a sign that the original footage does not have enough frames. Stretching footage recorded at 30fps to 0.5x effectively drops the playback frame rate to around 15fps, which looks choppy. We cover this in the next step.
Step 3: Record at 60fps or higher for smooth slow motion
The quality of slow motion is decided almost entirely at the recording stage, not the editing stage. The more frames you have to work with when stretching, the smoother the slow motion. So if you plan to use slow motion, we recommend recording at 60fps or higher from the start.
- 60fps: the baseline recommended setting that lets you smoothly stretch down to 0.5x half speed.
- 120fps: smooth down to 0.25x quarter speed, suitable for fast-paced fight scenes.
- 240fps: a setting that holds up even at an extreme 1/8 speed slow.
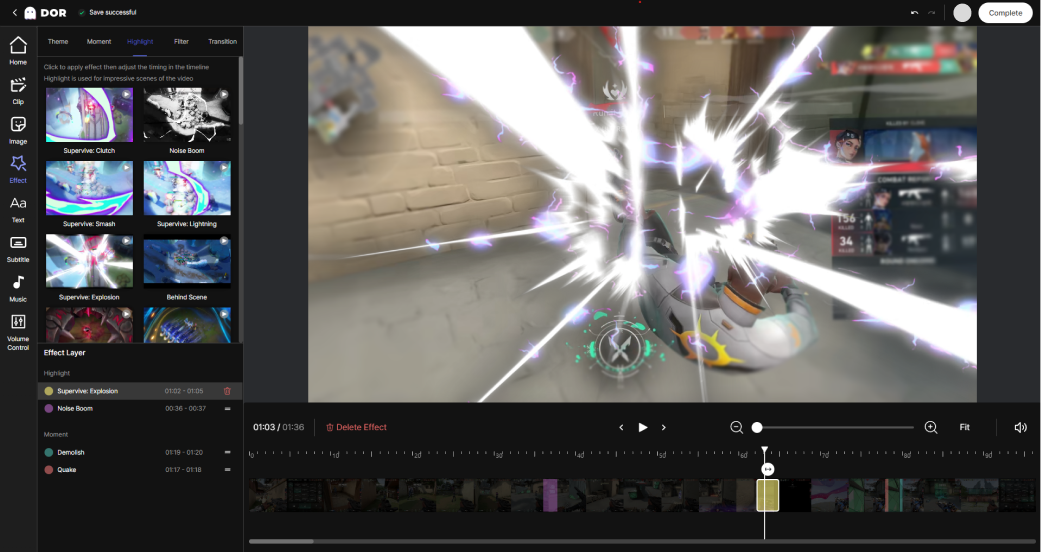
Making kill-moment slow motion with DOR
With DOR you can record at 60fps and turn the kill moment into smooth slow motion right in the editor. Because recording and editing flow together as one process, you do not have to hunt for high-frame-rate settings or move files into another program. The faster the game and the more fights it has, like Valorant or League of Legends, the more you feel this difference.
- Play with 60fps recording turned on in DOR.
- In the editor, select the range where the kill landed and lower the speed to 0.5x or 0.25x.
- Raise the speed of the parts before and after to emphasize the moment the slow motion kicks in.
- Preview the result, trim the length, and export it as a clip.
Kill-moment slow motion is a fundamental that you will use on every highlight once it becomes second nature. Just stick to three things, selecting the range precisely, adjusting speed with contrast, and recording the original at a high frame rate, and the impression your clips make will change dramatically.

