
You've probably had this happen at least once: it looked sharp while editing, but when you open the exported file, text is smeared and blocky artifacts creep into dark scenes. If the original game footage is fine but only the result is blurry, in most cases the quality leaked out in the export (render) settings, not the source itself. In this article, we'll dial in how to export with nearly all the quality intact, one step at a time in the order of resolution, bitrate, and codec.
Here is the bottom line: the principle is simple. First, export at the same resolution as the source; second, give it a high enough bitrate; third, use the H.264 or H.265 codec. Just keeping these three all but eliminates noticeable quality loss. The rest is fine-tuning the details to match the platform you're uploading to.
Why only the exported video loses quality
Video gets compressed once more on export. In this process, if the amount of data you can pack into each second, the bitrate, falls short, detail gets thrown out wholesale. Fast-moving game footage is especially hard to compress because every frame changes a lot, and when the bitrate is too low, the dark corners and parts like smoke and particles smear first. Protecting quality ultimately comes down to giving this compression the headroom to throw out less detail.
Another common trap is carelessly lowering the resolution and frame rate on export. Exporting footage recorded at 1440p to 1080p shaves off sharpness by exactly that gap, and exporting footage recorded at 60fps to 30fps cuts the smoothness in half. The baseline premise is always to keep the same resolution and frame rate as the source.
Step 1: Match resolution and frame rate to the source
When you open the export settings window, check the resolution and frame rate first. If your recording original is 2560x1440, export at 2560x1440 too, and if you shot at 60fps, set 60fps. The moment you lower them arbitrarily, you create irreversible loss, so unless you have a special reason, following the source values as-is is the safest.
Step 2: Give it a high enough bitrate
Bitrate is the value that most directly governs quality. The higher the bitrate, the more data it packs per second and the sharper it gets, but the file size grows along with it. For footage where it is short and quality matters, like a game highlight, it is better to weigh quality over file size and set it generously. Below is a recommended range to use as a starting point.
- 1080p 30fps: around 8Mbps
- 1080p 60fps: around 12Mbps
- 1440p 30fps: 16Mbps, 60fps: around 24Mbps
- 4K 30fps: 35 to 45Mbps, 60fps: around 53 to 68Mbps
These values are close to minimums, and to preserve quality more surely, you can raise them with some headroom. That said, the platform you upload to often sets its own bitrate cap, so even setting it excessively high means the platform re-compresses it anyway in the end. So for quality-critical work, setting it a bit above the recommended values is the balance point.
VBR 2-pass over CBR
There are two bitrate methods, CBR (constant) and VBR (variable). CBR uses the same bitrate across the whole video, while VBR allocates more data to complex scenes and less to simple ones. When teamfight scenes and static scenes are mixed, as in game footage, VBR comes out cleaner at the same file size. VBR 2-pass in particular analyzes the video twice and divides the data efficiently, so it has the best balance of quality and file size.
Step 3: Codec is H.264 or H.265
A codec is the rule that decides how the video gets compressed. The widest-compatibility, safest pick is H.264, and if you want to hold the same quality in a smaller file, H.265 (HEVC) is the better choice. H.265 makes a roughly 25 to 50 percent smaller file at a similar perceived quality compared to H.264, and this difference is especially pronounced in data-heavy footage like 4K.
- 1080p and needs to open anywhere: H.264
- High-resolution like 1440p or 4K and you want to reduce file size: H.265
- For the container (file format), MP4 is the safest
- For audio, AAC at around 320kbps is plenty
One thing to add: when you want to preserve as much quality as possible at an intermediate stage before upload, there is also the method of exporting once to a high-quality format with lighter compression. Even though the platform will re-compress it anyway, handing it a cleaner source reduces the artifacts created during compression, so the final result comes out better.
Step 4: Match upload recommendations for YouTube and the like
If you are uploading to YouTube, matching the platform's recommended values is the surest way to protect quality. YouTube's official recommendation is an MP4 container with H.264 video and AAC audio, and bitrates of 8Mbps for 1080p 30fps, 12Mbps for 60fps, and a 35 to 68Mbps range for 4K. For the color space, use Rec.709 for normal SDR footage, and turn on HDR settings only when the source is genuinely HDR.
Most importantly, keep the frame rate you recorded at. Converting game footage shot at 60fps to 30fps for upload makes the motion look choppy, and stacked with YouTube's re-compression, the perceived quality drops further. Don't touch original frame rates like 24, 30, or 60fps; upload them as-is.
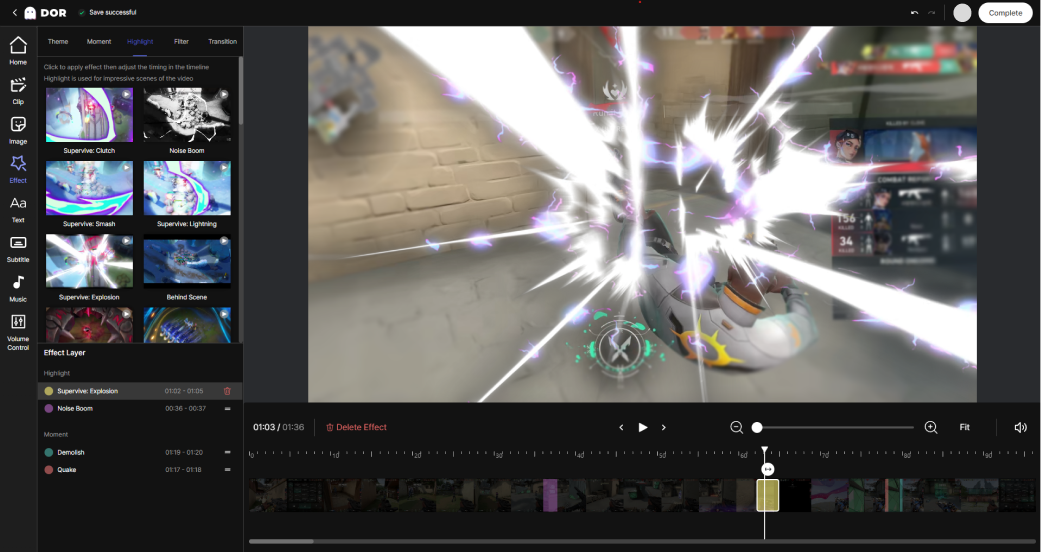
DOR's editor defaults to upload-ready quality
If matching resolution, bitrate, and codec one by one feels like a hassle, DOR handles that process for you. DOR's editor has low-quality-loss export settings by default, so an upload-ready clip comes out without touching complicated options. The standard of keeping the source resolution and securing enough bitrate is built in ahead of time, so a Valorant ace or League of Legends teamfight scene won't turn blurry.
On top of that, DOR automatically detects when a game launches, records in the background, and cuts the key moments into short clips on its own. Without pressing a record button or memorizing hotkeys, once clips pile up you just polish them in the editor and export as-is. Instead of spending time on quality settings, you can focus on picking the standout moments.
Wrap-up: a checklist for exporting that protects quality
- Keep resolution and frame rate at the source values
- Set bitrate a bit above the recommended values and encode with VBR 2-pass
- Codec is H.264 (general purpose) or H.265 (high resolution, file-size savings)
- Container MP4, audio AAC, and for SDR the color space is Rec.709
- Match YouTube's recommended values, and export short-form separately once more in vertical
Just covering these five lets you see almost exactly the sharpness from your editing screen in the result too. If matching the settings every time is a hassle, using a tool like DOR that supports low-quality-loss export by default is the fastest path.

