If you're right about to post your first game video, what to check ultimately boils down to four things. First, recording settings (resolution, fps, audio). Second, the minimum editing principles (trimming the front and an opening worth watching). Third, the title and thumbnail. Fourth, upload quality. Go through just these four in order and you can finish 0 to 1 without floundering even on your first try. This article is a step-by-step checklist that follows that exact order.

Step 1: What to Decide Before Recording
Before you press the record button, decide two things first. One is what kind of video you'll make. Whether you'll show a whole match or go with a highlights reel of just the best scenes changes what you need to keep. The other is your sense of length. For a first video, going short and fast at around 3 to 5 minutes rather than dragging it out makes it easier to get people to watch to the end. Deciding these two makes it clear what to mind while recording.
Step 2: Checking Recording Settings
Eight out of ten parts of quality are decided at the recording stage. Since it's hard to create quality that wasn't there through editing, getting it right when you first shoot is most important. For a first video, check the following values.
- Resolution: 1080p (Full HD) as the baseline. Even if your monitor is a higher resolution, recording at 1080p is plenty.
- Frame rate: 60fps. Game videos move fast, so 60fps is far smoother than 30fps.
- Audio separation: If possible, put the game sound and your mic voice on separate tracks. It becomes easy to adjust just one side's volume or drop one side later.
- Save path and capacity: Recording files tend to be large, so check the remaining space in your save folder in advance.
Step 3: Checking the Mic and Voice
In beginner videos, sound shows before quality does. If the game sound is too loud and your voice is buried, or keyboard and mouse sounds come in excessively, viewers leave quickly. You don't need an expensive mic. Even a headset mic is enough for a first video as long as you keep a consistent distance from your mouth and set the game sound volume a touch lower than your voice. If you recorded with the audio separated, you can rebalance this in editing.
Step 4: Editing Is Minimum Principles Only
For a first video, the key is an easy-to-watch flow, not flashy effects. If you think of editing as grand, you won't even be able to start. Just keeping the following minimum principles raises quality dramatically.
- Trim the front: Boldly cut out game loading, waiting, and sections where nothing happens.
- An opening worth watching: Briefly show the best scene or the result within the first few seconds to keep people watching.
- Cut boring sections: Chop up the parts that drag to keep a fast pace.
- Wrap up: End with a short greeting or a teaser for the next video.
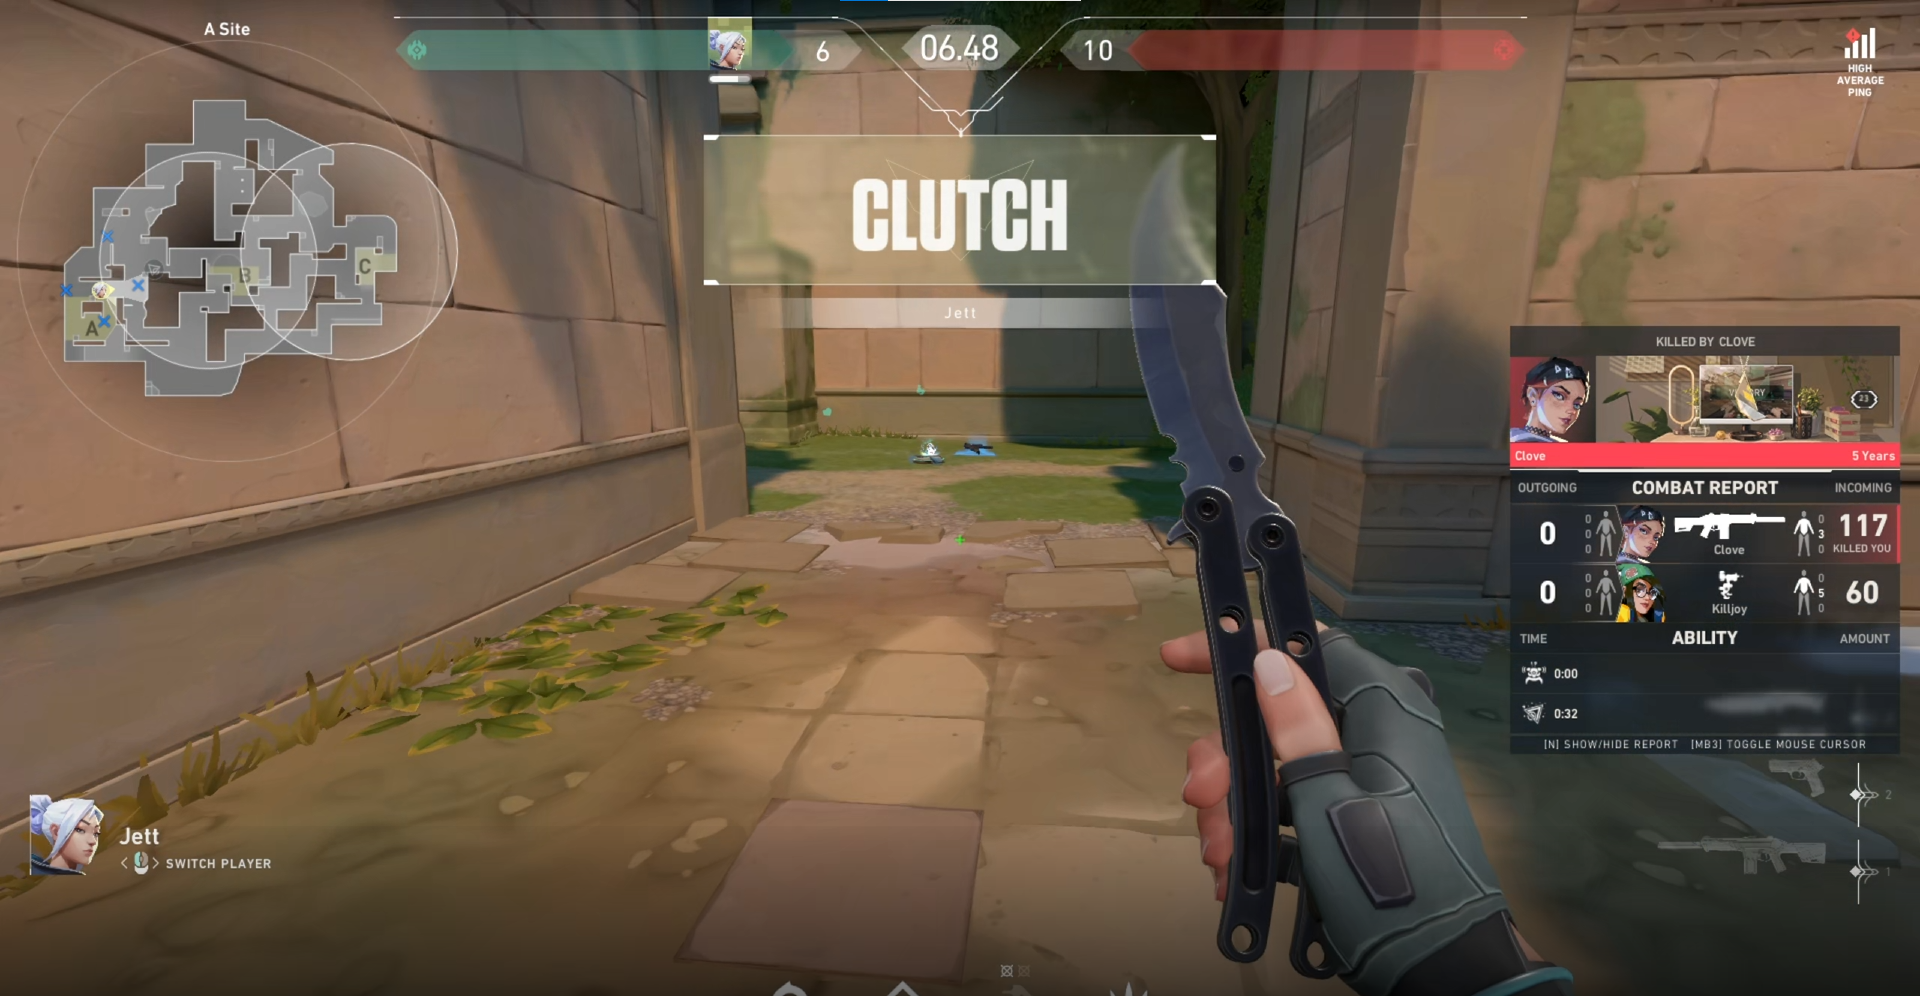
Captions, background music, and sound effects are options to add if you have the room, not requirements. The goal of a first video isn't perfection but making it all the way through and posting it. Just bringing out the key moments well, like an ace scene in Valorant or a comeback teamfight in League of Legends, is enough to make a video worth watching.
Step 5: Title and Thumbnail
What makes someone click a video isn't the content but the title and thumbnail. The title should make the game name and what kind of video it is clear at a glance. For example, rather than simply 'one match,' write it specifically like 'A Clutch Match Where I Got My First Ace in Valorant.' For the thumbnail, laying one or two large words over the single most decisive moment stands out better than a blurry game screen capture.
Step 6: Checking Quality and Settings Just Before Upload
The last step is upload settings. Quality often drops at the export and upload stage, so check once more here.
- Export resolution: Export at 1080p or higher, the same as the recording.
- Upload quality: Upload at a minimum of 1080p. Right after uploading, the quality may temporarily look low, but it rises to normal quality once processing (encoding) finishes.
- Description field: Add a sentence or two about what the video is plus the game name so it gets picked up in search.
- Visibility: At first, you can upload as unlisted, check the quality and sound on your own screen, then switch to public.
Common Mistakes Beginners Make
The mistakes that repeat in first videos are pretty much set. Knowing them in advance lets you avoid them outright.
- Recording a whole match with the mic not picked up and discovering it too late.
- Recording at 30fps so fast scenes look choppy.
- Not trimming the loading and waiting section at the front, so the opening drags.
- Not having recording on the moment a highlight happens, so you miss the best scene.
- Trying to edit perfectly, never finishing, and putting off the upload itself.
Of these, the most regrettable is the fourth, missing a highlight entirely. Great scenes always happen when recording isn't on. This problem is solved by changing the recording method itself.
Make Your First Video 0 to 1 Fast With DOR
Following the checklist above usually means going back and forth between a recording program, a clip tool, and an editor separately. DOR has these three gathered in one place, so you can finish your first video 0 to 1 fast. It automatically detects when a game launches and records in the background, so there's less chance of forgetting the record button and missing a highlight. Key moments like aces and comeback teamfights are automatically cut into short clips and gathered, and you can refine and export those gathered clips right on the same screen.
Thanks to that, just launching Valorant or League of Legends piles up the material for your first video on its own. Pick which clips to use, tidy up the front a bit, then export at 1080p and upload, and you're done. Finishing recording, clips, and editing in one place without having to learn several tools makes the biggest difference for someone just starting out.
To sum up, the order for a first video is clear. Record at 1080p and 60fps with the audio separated, edit by trimming just the front around the highlights, attach a title with the game name and a single-scene thumbnail, and upload at 1080p. Finishing and posting comes before perfection, and using DOR lets you cut that process much shorter.

