You upload a gaming clip to YouTube and the screen that was sharp in the local file looks blurry and blocky. Almost every gamer experiences this at some point. Let me start with the conclusion: there are two causes. First, the processing where YouTube temporarily shows a low-quality version right after upload. Second, an original file exported at a bitrate lower than recommended. The solution is clear too: render at the recommended bitrate, scale even a 1080p video up and upload in 4K, then wait until processing finishes.
Why gaming videos break up more easily on YouTube
YouTube re-encodes every uploaded video with its own codecs like VP9, AV1, and H.264. This re-encoding causes quality loss, and it is especially noticeable in fast-moving footage. Gaming videos are high-motion content where the camera whips around and effects fill the screen, so at the same bitrate, blocking happens far more easily than in everyday vlogs.
Game genre traits add to this. Scenes where smoke and ability effects momentarily cover the screen like in Valorant, or where dozens of skill particles burst at once during a teamfight in League of Legends, are the stretches a compressor struggles with most. When the bitrate is insufficient, quality collapses at exactly these decisive moments.
Cause 1: The low-quality temporary processing right after upload
Once upload finishes, YouTube encodes in order starting from low resolutions like 360p. So if you play the video right after upload, the high-quality option is not visible yet, or what shows is a temporary low-quality version. Judging the quality as broken by looking at the screen at this point is the most common misunderstanding.
High-resolution encoding takes time. 1080p usually takes tens of minutes, and 4K can take up to several hours. In other words, you should judge quality not right after pressing the upload button, but after processing fully finishes.
Cause 2: An upload bitrate lower than recommended
Bitrate is the amount of video information packed into one second. When this value is low, there is not enough information and the screen smears into blocks, called blocking. Many people match exactly the minimum recommended bitrate YouTube officially announced, then complain the quality is bad. The key is to upload with headroom above the recommended value, accounting for re-encoding loss.
As a practical rule, exporting 20 to 50% above the minimum YouTube published gives the re-encoding process room to work, so the resulting quality drops steadily. For 1080p, that means aiming for 12 to 15Mbps instead of the announced 8Mbps.
YouTube recommended upload settings
Below are recommended upload bitrates by resolution for standard dynamic range (SDR). For high-motion footage like games, it is safe to match the upper value of each tier.
- Container and codec: MP4 container, H.264 video codec, AAC audio recommended
- 1080p 30fps: around 8Mbps baseline, 12 to 15Mbps recommended for games
- 1080p 60fps: around 12Mbps baseline, 15 to 18Mbps recommended for games
- 1440p 60fps: around 24Mbps baseline, 28 to 35Mbps recommended for games
- 4K 30fps SDR: around 35 to 45Mbps recommended
- 4K 60fps SDR: around 53 to 85Mbps recommended
- Frame rate: keep what you recorded (e.g. export 60fps recordings at 60fps)
Step-by-step solution
Step 1: Re-render at the recommended bitrate
In your editing program's export settings, raise the bitrate to match the table above. When possible, choose constant bitrate (CBR) or 2-pass VBR so the information stays high even in high-motion stretches. Set the codec to H.264 and the container to MP4.
Step 2: Upload in 4K even for 1080p videos
YouTube tends to prioritize more efficient codecs (VP9, AV1) for videos uploaded in 4K. So even a video shot in 1080p, if you upscale it to a 4K (2160p) canvas at the editing stage and export, often looks sharper when played back at the same 1080p. It is especially effective for detail-heavy content like gaming videos.
Step 3: Wait until processing finishes, then check
After upload, wait until the 1080p or 2160p option appears in the quality gear. If breakup is still visible after the option appears, that is when you re-check the original bitrate. Rashly re-uploading by looking at the screen mid-processing is the main culprit of wasted time.

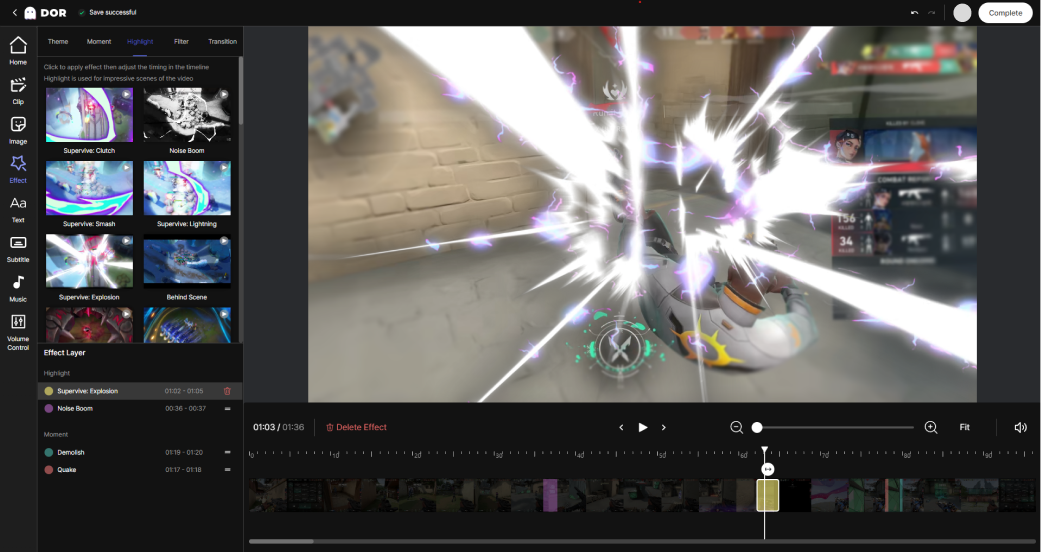
Why exporting with DOR has less quality loss
Dialing this process in manually every time is a hassle. The DOR editor is designed to export at a bitrate suited to YouTube uploads, so there is less quality loss from exporting below the recommended value. It flows from game recording to editing to export in one stream, so you do not have to calculate settings one by one.
Even high-motion clips like Valorant or League of Legends highlights come out sharp without breakup when you upload the file exported straight from DOR in 4K and just wait for processing.
Summary
Quality loss in YouTube gaming videos is usually solved two ways: render at a bitrate with headroom above the recommended value and upload in 4K, and judge quality after processing finishes. Just building these two habits turns blurry, smeared clips into sharp ones.

