
You saved a kill scene or a teamfight you carried as a clip, but when you go to install an editor, it's several gigabytes, the install alone takes minutes, and after you finally export it, there's a watermark stuck in the corner of the screen. What actually matters for editing game clips narrows down to three things: (1) low install overhead, (2) no watermark left on the result, and (3) the ability to finish cuts and captions fast. As long as you meet those three, you don't need film-grade color grading to polish up a game highlight. In this article, as of 2026, we compare free editors you can actually use, split into desktop and browser-based, and lay out an editing flow suited to game clips.
Desktop vs Browser-Based: What's the Difference?
Free editors broadly split into desktop tools you install on your computer and browser-based tools you open straight in a web browser. Desktop tools use your PC's resources directly, so they're stable for long or high-resolution work and let you handle deep features like color grading and transitions. The trade-off is large file size and a learning curve up front. Browser-based tools let you start editing the moment you connect, with no install, which fits light work like cutting a 30-second to 1-minute game clip and laying captions on top.
Game clips are mostly short, and the flow is often about quickly polishing one scene and sharing it. So in many cases, a browser-based tool that opens a recorded clip and just finishes the cuts and captions fits better than a heavy, feature-packed desktop tool. Conversely, if you want to stitch several clips into a long highlight reel or do fine color adjustments, a desktop tool has the edge. Deciding which kind your work is makes the choice easy.
Comparing Free Editors With No Watermark
Below are the leading tools you can use for free with no watermark as of 2026. We've laid out each tool's platform, whether it has a watermark, difficulty, and notable points. Note that even with a free tool, using some paid-only effects or premium stock assets can block export or attach a mark, so it's safest to use only your own clips and free assets.
- DaVinci Resolve, desktop (Windows/Mac/Linux) / no watermark (a mark appears only when using Studio-only effects) / high difficulty / capable of pro-grade color grading and editing despite being free, with output up to 4K/60fps. Using its features properly takes some learning.
- Shotcut, desktop (Windows/Mac/Linux) / no watermark / medium difficulty / completely free as open source, it loads a wide range of formats directly without extra codecs and exports cleanly.
- Kdenlive, desktop (Windows/Mac/Linux) / no watermark / medium difficulty / one of the deeper-featured open-source tools, offering multitrack, captions, and transition effects for free.
- Clipchamp, browser-based (web/Windows app) / no watermark / low difficulty / can export 1080p with no watermark for free, though adding premium stock assets prompts an upgrade.
- CapCut, desktop/mobile/web / no watermark (auto-insertion can be turned off) / low difficulty / strong auto-captions and templates make short-form creation fast, but some features are moving to paid, so check the free scope.
- Canva, browser-based (web) / no watermark (based on your own uploaded media and free assets) / low difficulty / easy to drag in captions and text with one move, suited to light editing.
The Game Video Editing Flow: Cut → Caption → Music
Whatever the tool, the skeleton of editing a game clip is similar. No matter which tool you use, just follow these three steps and you'll get a good-looking highlight. Rather than getting greedy with lots of features from the start, it's faster to finish just one thing at a time, in the order of cut, caption, music.
Step 1: Cut Away the Fluff
First, put the clip on the timeline and cut out the unnecessary parts before and after the key scene. For game footage, starting 2 to 3 seconds before the decisive moment and keeping only through just after the finish keeps the tension alive. If there are several good scenes in one clip, cut and splice out the dragging stretches between them to compress the flow. Just doing the cuts cleanly means half the video is done.
Step 2: Add Captions for Context
Next are short captions that explain the situation. One line like "1v3 clutch" or "ultimate hit" lets viewers understand the scene right away. For readability, give the text an outline or a dark background, and place it where it doesn't overlap the game UI or enemies. Captions don't need to be long, keeping them short and to the point breaks immersion less.
Step 3: Match the Mood With Music
Finally, lay down background music to set the mood. A fast-beat track suits a tense teamfight, while a light track suits calm play. Just keep the background music volume low so the game sounds (gunfire, ability sounds, pings) don't get buried. To avoid copyright issues, use the free audio your editor provides or royalty-free music.
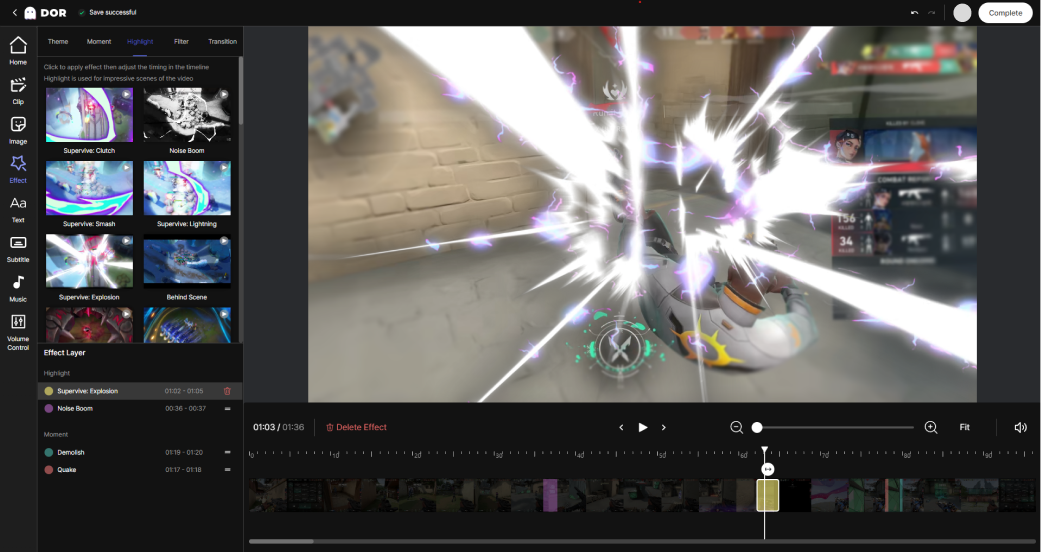
From Recording to Editing in One Place, DOR
Looking at all this, one hassle stands out: you record with a recording program, then have to install a separate editor and move the file over to edit. The process of installing a heavy editing tool just to polish one clip, finding and importing the file, then exporting and re-sharing it, takes more effort than you'd think.
DOR combines this flow into one. You can open a clip you recorded of your game screen in DOR right in the browser with no separate install, cut it, add captions and music, and export it for free. In other words, since recording, editing, and sharing all finish in one place, there's no need to move files or install a new program. For work like game clips that you polish and post quickly, this structure with recording and a free editor attached saves a lot of time.
Which Tool Should You Choose?
To sum up, the choice criterion is the weight of the work. If you want to stitch several clips into a long highlight and go deep on color grading, a desktop tool like DaVinci Resolve or Kdenlive fits. Conversely, if your goal is to quickly cut a short game clip, lay on just captions, and post it, a browser-based tool that opens instantly with no install is far more efficient. Especially for a clip recorded with DOR, editing it right there and exporting for free, with nothing to move, is the fastest route.

