
You definitely hit the record button and the video file came out fine, but when you play it, you can't hear a shred of game sound. The picture is fine, which makes it even more frustrating. Bottom line, it's usually that OBS's 'Desktop Audio' device is set wrong, or that the sound is audible but isn't making it into the recording track, a monitoring setting issue. Follow the order below and you can pin down the cause exactly.
First, sort out which sound is missing. (1) Only game sound is missing (2) Only mic sound is missing (3) Both are missing. These three involve different settings. You can decide your situation and jump straight to the matching branch.
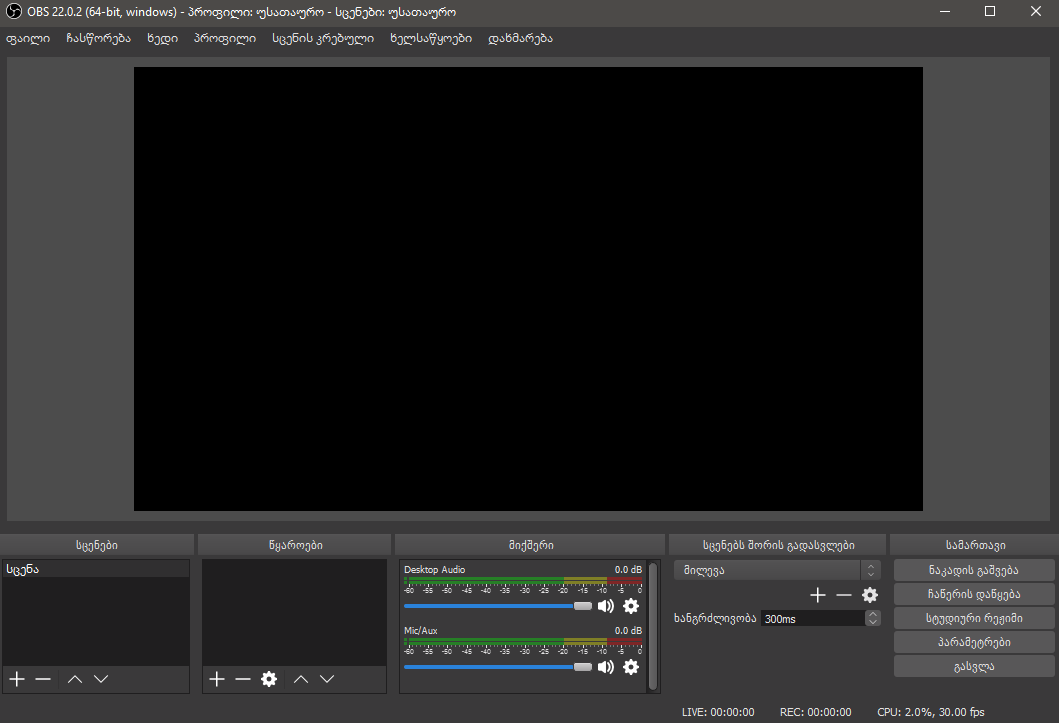
Step 1. First Check Whether the Bars Move in the OBS Mixer
Look at the 'Audio Mixer' panel at the bottom of OBS Studio. With the game playing audibly, if the 'Desktop Audio' bar bounces green, the sound is being captured but isn't making it into the recording; if the bar is dead, the device itself isn't being picked up. This one check decides whether you go to Step 4 or Step 2.
Step 2. Set the Desktop Audio Device by Name, Not 'Default'
If the bar is dead, it's a device-setting issue. From the OBS top menu, go to File > Settings > Audio. Under 'Global Audio Devices,' don't leave 'Desktop Audio' on 'Default'; open the dropdown and directly select the name of the actual output device the sound is coming out of right now (e.g., Speakers (Realtek), Headset Earphones). 'Default' frequently points to the wrong device whenever Windows switches devices.
- Set the sample rate to 48kHz and the channels to 'Stereo.'
- Desktop Audio: select the name of the speaker/headset you're actually listening through.
- Mic/Auxiliary Audio: if it's 'None' or 'Disabled,' change it to your mic's name.
- After selecting, click Apply > OK and check that two bars appear in the mixer.
Step 3. When Only Mic Sound Is Missing
If the game sound makes it in but only your voice is missing, check the mic device and Windows permissions. In Settings > Audio, confirm that 'Mic/Auxiliary Audio' is set to the correct mic, then in Windows Settings > Privacy & Security > Microphone, check that 'Let apps access your microphone' and the desktop-app item are turned on. If these are off, OBS can't pick up the mic at all.
- Check that the speaker icon next to the mic bar in the mixer isn't muted (red line).
- See that the volume slider below the mic bar isn't dragged all the way down to 0.
- If a game or Discord has exclusive hold of the mic, OBS may not pick it up, so close that and test.
Step 4. When the Bars Move but There's No Sound in the Recording (Monitoring)
If the bar bounced fine in Step 1 but there's still no sound in the video, it's the monitoring-setting trap. In the mixer, open the gear icon next to Desktop Audio > 'Advanced Audio Properties.' Look at the 'Audio Monitoring' column for that source. If it's set to 'Monitor Only,' you hear it through your ears but it doesn't make it into the recording file. Changing it to 'Monitor and Output' or 'Monitoring Off' (if you don't need to hear it) includes it in the recording.
Step 5. Recording System Sound and Mic on Separate Tracks
To adjust game sound and voice volumes separately when editing, you need to split the tracks. In OBS, this is a manual step. Change the Settings > Output tab to 'Advanced,' then check audio tracks 1 and 2 in the 'Recording' tab. After that, in Advanced Audio Properties, set it so game sound is checked on Track 1 only and the mic on Track 2 only. This way two tracks are stored separately within one file and can be split in an editor.
- Change Settings > Output > Output Mode to 'Advanced.'
- Check audio tracks 1 and 2 in the Recording tab.
- In Advanced Audio Properties, split Desktop Audio to Track 1 and the mic to Track 2.
- It's safest to set the recording format to mkv or mov, which support track splitting.
Step 6. If Desktop Audio Still Won't Get Picked Up
If you set the device by name but the bar is still dead, it's a driver or exclusive-mode issue. In Windows Sound settings > that output device > Properties > Advanced, uncheck 'Allow applications to take exclusive control of this device.' If a game has exclusive hold of the audio device, OBS can't receive the sound. If that still doesn't work, reinstall the sound driver to the latest in Device Manager.
- Disable 'allow exclusive control' for the output device in Windows Sound settings.
- Check that there's no exclamation-mark warning under the Sound item in Device Manager.
- Close other recording programs like Camtasia or Movavi if they're running at the same time.
- As a last resort, fully quit and relaunch OBS so it re-picks up the device.
DOR Doesn't Need This Whole Process
If you've read this far, you've probably felt it, OBS makes you set the desktop audio device, mic device, monitoring, and track mapping all by hand. Get any one field wrong and the sound drops out entirely. DOR records game sound and mic to separate tracks automatically just by launching. There's no digging through device dropdowns, and no sound dropping because monitoring was set to 'Monitor Only.'
Track splitting matters more the more voice chat a game has. For Valorant or Overwatch clips, you need to adjust team voice and game sound-effect volumes separately to make them look good, and the same goes for League of Legends teamfight scenes. DOR handles this with no setup, so the very habit of checking whether the sound dropped after every recording disappears.
To sum up, when there's no game recording sound in OBS, checking in this order, (1) the mixer bars, (2) setting the desktop audio device name, (3) the mic device and permissions, (4) monitoring set to 'Monitor and Output,' (5) track splitting, solves almost everything. If you'd rather not repeat this process every time, using automatic split-track recording is the surest fix.
