Here's the bottom line: adding a facecam to a game recording is the work of adding your webcam as a source separate from the screen, then laying it on top of the game screen as a small overlay. Add a green backdrop and chroma key on top of that, and you can float just the outline of your face cleanly, with no rectangular box. Follow the steps below in order and the setup is done within 10 minutes, even on your first try.
The reason to add a facecam is simple. Even with the same gameplay footage, viewers watch much longer when they can see your reaction in a corner of the screen. When your expression in a clutch moment or your cheer as a teamfight pops off is captured alongside the screen, that itself becomes content. That's why nearly all game clips these days lean toward capturing the face together.

Step 1: Add the webcam as a separate source
The very first thing to do is register the webcam as a single source separate from the game screen. Capture the game screen with a display capture (or game capture) source, and capture your face separately with a webcam (video capture device) source. You have to separate these two sources so you can move and resize just your face later.
- In your recording program, open the add-source menu and select Video Capture Device (webcam).
- Choose your connected webcam device and set the resolution to 720p or higher.
- Order the layers so the game screen source is below and the webcam source is on top.
- Confirm in the preview that your face is captured properly.
Step 2: Position the facecam overlay
Where you put your face shapes the video's impression. The basic principle is a corner that doesn't cover the game's important UI. Most games crowd the minimap, health bar, and skill slots at the edges of the screen, so pick an empty corner that avoids them.
- Bottom-left: works fine for games with the minimap on the right.
- Bottom-right: suitable when the minimap is on the left or chat is in the bottom-left.
- Top-left: often used in shooters where the scoreboard or kill log is in the top-right.
- Bottom-center: good for splitting your face top and bottom when cropping to vertical (Shorts/Reels) clips.
UI positions differ by game, so checking directly is the most accurate. For example, Valorant has the minimap in the top-left and health and ammo in the bottom-center and right, so the bottom-left is relatively safe. League of Legends crowds the minimap and item window in the bottom-right, so the bottom-left or top-left works fine. Run a quick match and spot the empty space with your own eyes.
Step 3: Adjust the size
Once you've decided the position, it's time to shrink the size. When you first add a webcam it often fills the screen, but a facecam looks more natural the smaller it is. Around 15 to 20% of the full screen width is usually right. Too big eats up the game screen, and too small means your expression isn't visible, which defeats the purpose.
- Grab the corner handle of the webcam source and shrink it while keeping the aspect ratio.
- Find the minimum size where your expression and mouth are still visible.
- Float it slightly inward from the screen edge so it isn't cut off.
- If you plan to crop to a vertical clip after recording, place it in a safe area where your face won't be cut off.
Step 4: Erase the background with chroma key
Up to this point, your face is sitting inside a rectangular box. To get rid of the box and float just your face outline naturally over the game screen, you need chroma key. Chroma key is a feature that picks a specific color (usually green) and makes it transparent. Put a green backdrop behind you and erase that green, and only your face remains.
- Hang a wrinkle-free green (or blue) backdrop behind your face.
- Add a chroma key filter to the webcam source.
- Select green as the key color and adjust the similarity (threshold) so only the background gets erased.
- If a green edge remains around your face, fine-tune the smoothness/similarity values.
Tips for a cleaner background removal
- Light the backdrop evenly to eliminate shadows and brightness differences. A blotchy green doesn't key out well.
- Avoid green clothing or accessories. The clothing turns transparent too, making your body look see-through.
- Keep enough distance between your face and the backdrop so the cloth's shadow doesn't fall on your shoulders.
- If you don't have a backdrop, using a tool with an AI background removal feature instead of chroma key is also an option.
Adding a facecam with DOR: both at the editing stage and live
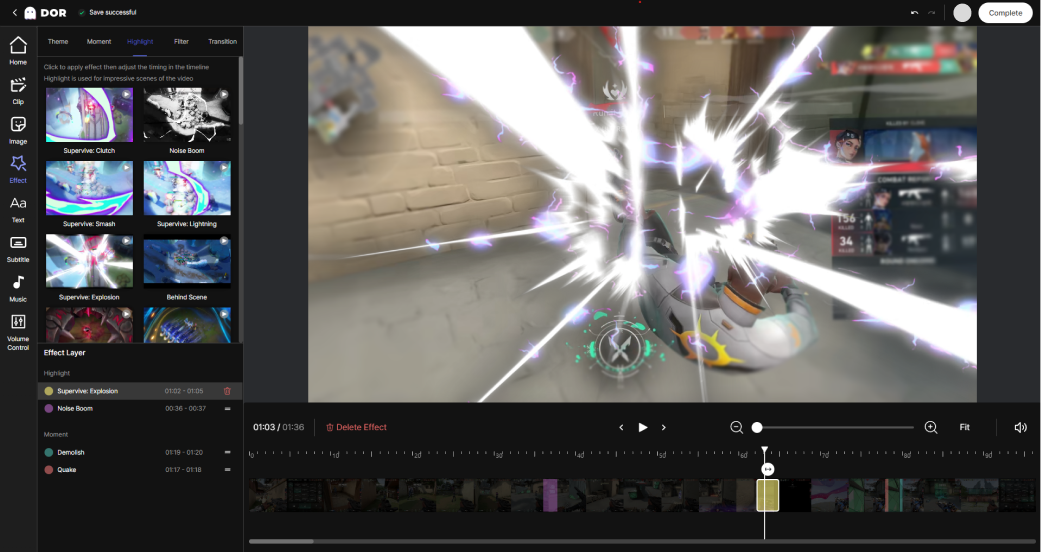
DOR's strength is that you can freely choose when to add the facecam. You don't have to overlay your face in advance while recording. You can add a facecam to a game clip recorded with DOR at the editing stage, or overlay it live right over the game screen.
Adding it at the editing stage is less of a burden. Just focus on play and record the game, then later cut the good moments into clips and lay the facecam on top of them. You can adjust position and size while watching the clip, so you can even do staging like enlarging your face only at the best moments.
Conversely, overlaying live gives you a finished product with your face in it the moment recording ends. If broadcasting or fast uploading is the goal, this method is efficient. Either way, the game screen and your face are managed separately, so it's convenient when you want to adjust just one of them.
Wrap-up: just follow this order
To sum up, it's all just three steps: add the webcam as a separate source, place it small in a corner that avoids the UI, and erase the background with chroma key. Set it up once at the start and you can reuse it as is from then on. With DOR you can produce the same result whether you lay it on in editing after recording or overlay it live, so pick the side that fits your workflow and get started.

