
Let's start with the conclusion: a highlight video that holds viewers isn't built on flashy transitions but on good clips picked and stitched together short, in order of impact. Pull five to ten great moments, put the strongest cut up front, trim the fluff, and wrap it up in roughly 30 seconds to a minute, and that alone makes a reel worth watching. The whole process is five steps: gathering clips, selecting the good cuts, arranging by impact, finishing with cuts, music, and captions, and exporting to platform specs. The most time-consuming part, surprisingly, isn't the editing but the first two steps, gathering the material and finding the good moments, so this article focuses especially on how to make those steps lighter.
Step 1: Start by gathering the clips that will become your highlights
Editing can't start without material, and this is exactly where many people get stuck. If you record a full hour of playback in one chunk, you have to scrub endlessly back and forth on the timeline to find the good moments. So the key is to break out each great moment into a short clip right when it happens. When you have a separate clip stacked up for every high-impact moment, like a Valorant ace, a PUBG clutch, or an Overwatch team kill, you can just gather those clips and build the video right away, without digging through your material later.
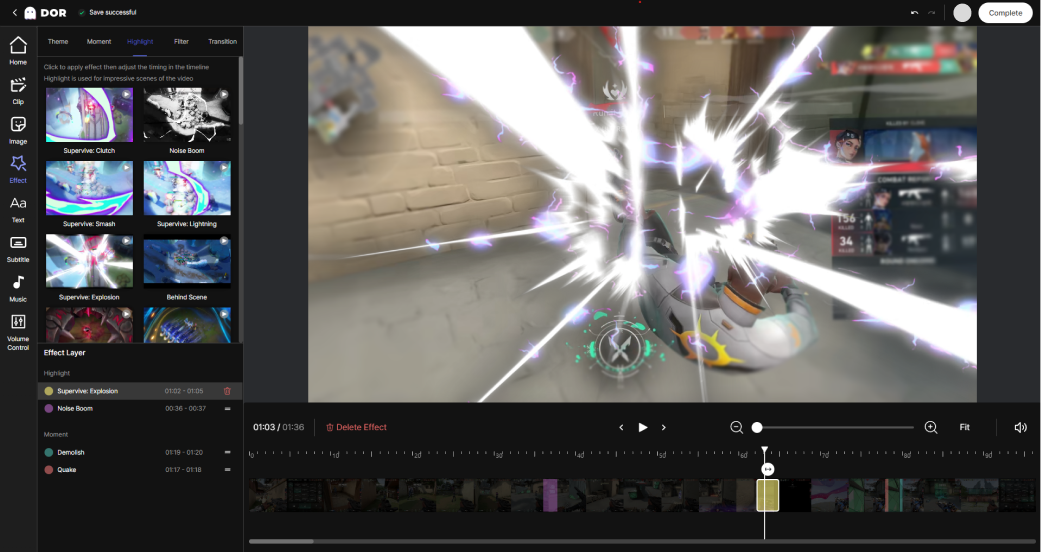
This is where DOR's strength shows. DOR automatically detects kills and highlight moments during play and breaks out just those segments as clips. Without the manual work of finding and cutting segments, your highlight material piles up on its own simply by playing the game. By the time you start editing, the good clips are already gathered in one folder, so the gather-the-material step disappears entirely.
Step 2: Pick out only the good clips
Once the material is gathered, selection comes next, and a highlight's quality is, in fact, mostly decided at this step. Scan through your collected clips, keep only the ones genuinely worth showing, and cut the so-so moments without hesitation. Keep moments with a clear outcome (kills, clutches, comebacks), moments with clean execution, and moments whose impact lands at a glance, and exclude moments you won by luck or that need long context for a short reel. For a reel of about a minute, five to ten clips is about right, and if you have a lot of clips stacked up, don't include them all; trimming down to the day's strongest moments makes for a stronger video.
- Clips to keep: kills, clutches, and comebacks with a clear outcome, moments with clean execution, and moments whose impact lands at a glance
- Clips to cut: moments you won by luck, moments that need long context, and duplicates of similar moments
- The right count: 5 to 10 for a 30-second to one-minute reel, trimmed down to the strongest moments
Step 3: Arrange them in order of impact
Laying your chosen clips on the timeline in chronological order is the most common mistake. A highlight isn't a documentary; it's a short show, so the strongest moment has to go right up front. If you don't grab attention within the first 2 to 3 seconds, viewers just scroll past. The basic framework is to open with the highest-impact cut, mix in moments with different textures rhythmically through the middle, and close with a clean, decisive cut. Alternating types, like a clutch after a kill scene and then some movement, keeps people watching to the end.
Don't over-decorate between clips
Putting a flashy transition between every single clip actually makes things busy. For most of them, a simple straight cut to the next is the cleanest. Saving transitions for just one or two spots where the mood shifts significantly is plenty. Fewer effects, stronger moments is the basic instinct of a highlight reel.
Step 4: Finish with cuts, music, and captions
Once the arrangement is done, it's time to polish. First, trim the fluff off the front and back of each clip. Shaving off the stretch of walking around before a kill and the pause afterward sharply raises the density of the video. You can think of highlights as the work of removing all the gaps. Background music lifts the mood in one stroke, but don't kill the original game audio completely; leaving a little of the kill sounds or the effects of decisive moments makes the hits feel punchier. Use copyright-free tracks, and lining up the music's climax with the strongest moment has a big payoff.
Don't add long captions. A short one-liner describing a moment, or a weapon or situation label, is plenty. When making a vertical video, account for top and bottom cropping and keep captions in the center safe area. Finally, adding a brief subscribe or follow sticker at the end of the video helps your channel grow.
Step 5: Export to the specs of the platform you're posting to
The last step is exporting. You have to match the aspect ratio and length to where you're posting. Vertical platforms like Shorts, Reels, and TikTok default to a 9:16 ratio and under a minute, while horizontal YouTube video uses 16:9 as standard. Even with the same clip, it's better to crop once more for vertical so the key action sits in the center. Export at 1080p or higher if you can, and exporting FPS highlights with lots of fast motion at 60fps makes the action look smoother. Producing both a horizontal and a vertical version of the same video lets you post to several platforms at once.
Steps DOR shortens: automating material gathering and selection
Of the five steps so far, the most hands-on parts are Steps 1 and 2, gathering the material and finding the good moments. DOR automates exactly this stretch. Because it automatically detects kills and highlights during play and breaks them out as clips, by the time the game ends your good moments are already organized clip by clip, and the work of digging through a long video to find great segments disappears entirely. Those collected clips flow straight into a highlight reel in the DOR editor. Picking clips, setting their order, polishing cuts, and laying on music and captions to finish one complete video all happen in one place, so there's no bouncing between a separate recording program and an editing program.
To sum up, a good highlight video starts with good clips. Just follow the basic flow of selection, arrangement, and a short finish, and anyone can make a reel worth watching, while the tedious steps of gathering material and finding great moments can be eased through automation. Let DOR stack your best moments automatically and finish them into a reel right in the editor. The time you spend making a video shifts to focus on the editing itself.

