
When you watch a gaming montage made by a pro, the kill moments hit exactly on the music's beats, and the screen comes alive with every cut. When you try to make one yourself, though, it can feel overwhelming, like you don't even know where to start. But making a montage actually breaks down into three surprisingly simple steps. A montage is finished when you first gather great clips, second match your cuts to the music's beats, and third wrap it up with captions and effects. In this article, we walk through these three steps in order so that even a first-timer can follow along.
First, let's clear up the terminology. A montage is a short highlight video that edits a game's best moments together in time with music. The format is the same one Korean players call a 'mad movie,' and the two terms point to essentially the same thing. The key is that you weave short, impactful moments together with the music in one breath, rather than stringing out long stretches of full gameplay.
Step 1: Start by Gathering Great Clips
The quality of a montage is decided more than half by your raw material rather than your editing skill. No matter how well you sync the beats, if the clips themselves are dull the result falls flat, and conversely, if you have enough impactful moments, even rough editing becomes watchable. So the very first thing to do is to secure a generous supply of usable clips.
What kind of moments work well in a montage? Aces and multikills in Valorant, pentakills and clutch teamfight comebacks in League of Legends, environmental kills and a decisive ultimate in Overwatch, moments that are short and explosive in their own right, are great. Prioritize clips with immediate visual impact over strategic plays that need a long explanation to land.
- Moments with clear impact: multikills, clutches, comebacks, moments where the result is obvious at a glance
- Keep them short: about 3 to 8 seconds per clip, starting just before the climax and keeping only the core
- Collect with room to spare: gather 2 to 3 times the footage you plan to use in the final video so you have the freedom to pick and choose
- Keep quality consistent: record at the same resolution and frame rate when possible to reduce conversion loss during editing
This is where most people get stuck the hardest. The amazing plays always happen when you didn't have recording on, and manually hitting the record button every time you play is a hassle. If you're short on clips, montage production never even gets started, so how smoothly you clear this Step 1 determines the pace of the whole project.
Automate Clip Collection and Step 1 Disappears
DOR automatically detects when your game launches, records in the background, and cuts highlights like kills, aces, and pentakills into short clips on its own. There's no need to hit a record button or scrub through long footage hunting for the best moments. Just play as you normally would, and your montage material piles up in a folder by itself, so the instant you close the game, your clips are already ready to edit. In effect, the biggest chore of Step 1 disappears entirely.
Step 2: Pick Your Music and Match Cuts to the Beats
Once your clips are gathered, it's time for the heart of a montage: the music and beat syncing. This step is exactly what makes a montage different from a plain highlight reel. When your cuts land in lockstep with the music's beats, the video gains energy and the viewer's body starts moving to the rhythm.
Decide on the Music First
The right order is to pick your music before you edit, because the music sets the mood of the video. The clearer and more dynamic the beats, the easier it is to match your cuts. Just keep in mind that if you use copyrighted commercial music as-is, you can get a copyright claim on YouTube and elsewhere that blocks monetization or takes the video down, so it's safer to use royalty-free tracks from the YouTube Audio Library or free music sites.
Find the Beats Using the Waveform
Most editing programs display a waveform showing the loudness of the sound when you drop music onto the timeline. At the moment a beat drops, the waveform spikes up and down sharply, and that spike is exactly where you want to place your cut. If you play the music and drop a marker on the timeline at each audible beat, those markers become the grid for cutting and arranging your clips.
Place Your Cuts on the Beats
Now arrange your clips to match the beat markers you dropped. The key is to adjust each clip's length so that the cut point where a new clip begins overlaps with the moment a beat drops. In fast sections, cut clips short and switch quickly; in slow sections, let a single clip play longer. Think of it as translating the music's dynamics directly into the speed of your clip transitions.
- Landing a kill or impact moment on the hardest beat drop doubles the sense of impact
- Place your most impactful clips on the chorus or drop section of the music
- Start the intro slow, then drive the cuts fast on the chorus to create a build and payoff
- Don't insist on one cut per beat; use cuts on strong beats and effects like zooms or shakes on weak beats to add variation
Step 3: Finish with Captions and Effects
Once your cuts and beats are locked together, the video's skeleton is complete. The last step is to layer on captions and effects to raise the level of polish. Just remember that with effects, more is not better; they're most effective when used sparingly at the moments a beat is emphasized.
Add Context and Rhythm with Captions
Captions play two roles. One is delivering context. Briefly telling viewers what kind of play it is and which champion, agent, or weapon is involved helps them understand the scene quickly. The other is emphasizing rhythm. Popping a kill count or a short exclamation onto the screen in time with the beat makes the caption itself part of the beat sync. Keep your text large and short, and place it where it won't block the view.
Use Effects Only Where the Beat Is Emphasized
The effects most commonly used in montages are the zoom punch that slightly enlarges the screen on the beat, transitions that smoothly bridge cuts, and slow motion that emphasizes a slowed-down action. If you apply slow motion just before the most impactful moment and then burst back to normal speed as the beat drops, the sense of impact comes alive dramatically. But putting effects on every cut just makes things busy, so the right answer is to pick and use them only on the key moments you want to emphasize.
- Zoom punch: enlarge the screen for an instant on a strong beat, then return it to visualize the rhythm
- Slow motion: apply it just before the climax to build tension, then release to normal speed on the beat
- Transitions: bridge cuts smoothly, but in fast sections a simple cut looks cleaner
- Color grading: unifying the tone of the whole video ties together footage from different games into one piece
Exporting: The Last Step to Preserve Quality
When editing is done, you export the video. Set your settings to match the platform you'll upload to. For a standard horizontal video, the basic formula is the H.264 codec, an MP4 file, and a generous bitrate appropriate to your resolution. For YouTube, set 1080p to 12 Mbps or higher so that motion-heavy game scenes don't get muddy. If you're uploading as Shorts or Reels, make it at the 1080x1920 vertical 9:16 ratio so the screen fills completely with no black bars on top and bottom.
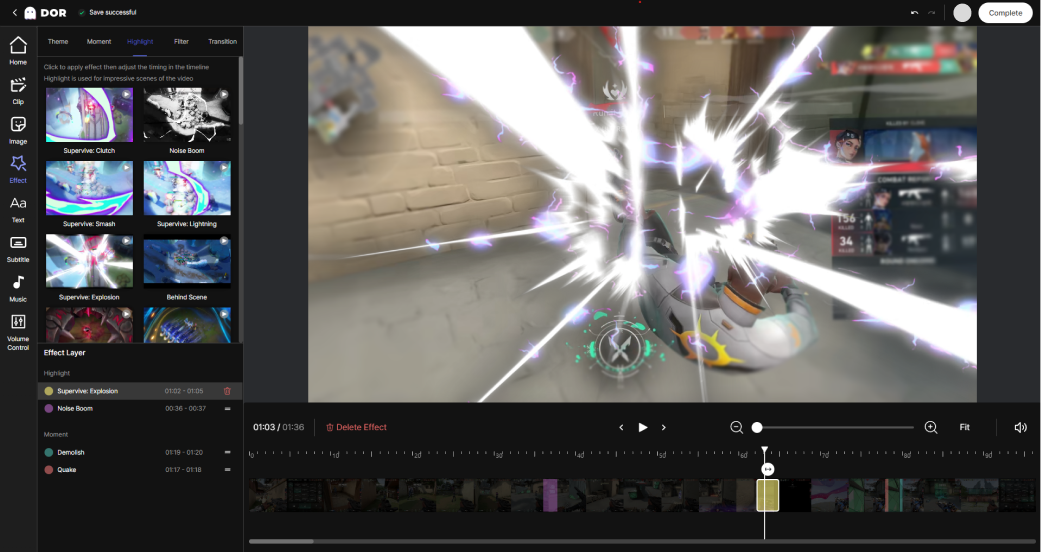
Finishing Clip Collection and Editing in One Place
Looking back at the three steps so far, the parts that take the most time are, surprisingly, not the editing but Step 1, collecting clips, and the prep work of moving those clips into an editor. DOR solves both of these at once. It automatically turns kills and highlights into clips so your montage material gathers itself, and you can edit the collected clips right away in the free in-browser editor. Without installing a separate heavy program or moving files around, the flow of cutting clips, layering on music, and finishing a montage all continues in one place.
To sum up, here's how to make a montage. Gather plenty of impactful clips, pick music with clear beats and match your cuts to the beat points on the waveform, emphasize the rhythm with captions and effects to finish, and then export with settings suited to your platform. The first one takes time to make, but once you automate clip collection and get used to beat syncing, your pace picks up fast. Check out automatic clip examples on the pages for the games you play most: Valorant, League of Legends, Overwatch.

