To add a screen shake effect to a game clip, use your editor's shake effect (Camera Shake or Wiggle in Premiere Pro) or position keyframes, or open the Moment tab in DOR Studio's Effect panel, click Shake Zoom or Handheld, and adjust the timing in the timeline. This post covers making a steady kill clip shake on purpose, not fixing footage that already shakes. The steps use the install-free DOR browser clip editor, and a table shows how common editors document the same result.
The short answer: one click or your own keyframes
If you want a ready-made shake that you pick by name, the Moment tab in DOR Studio is the better fit. If you want to decide the direction, size and timing of every movement yourself, position or rotation keyframes in a general editor fit better. Either way, trim the kill moment first, as covered in this game highlight editing workflow. Menu names change between editor versions, so the names in this post follow official documentation as checked on October 6, 2026.
Adding a shake effect in DOR Studio
- 1Add the clip — Open dor.gg/studio in your browser and use Add Video to bring in the kill clip you want to shake. It is easier to pick the Video Ratio for where the clip will be posted first; if you change it later, the effects reload to fit the new ratio and some may come out different. If the app already made a kill clip for you, you can upload that file as it is.
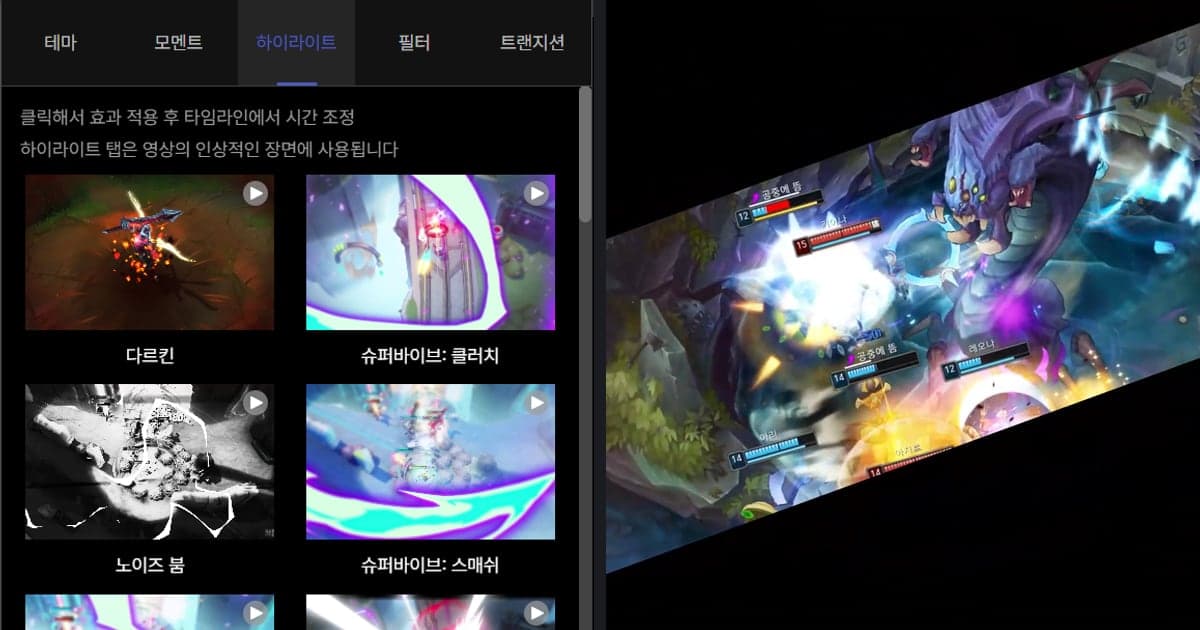
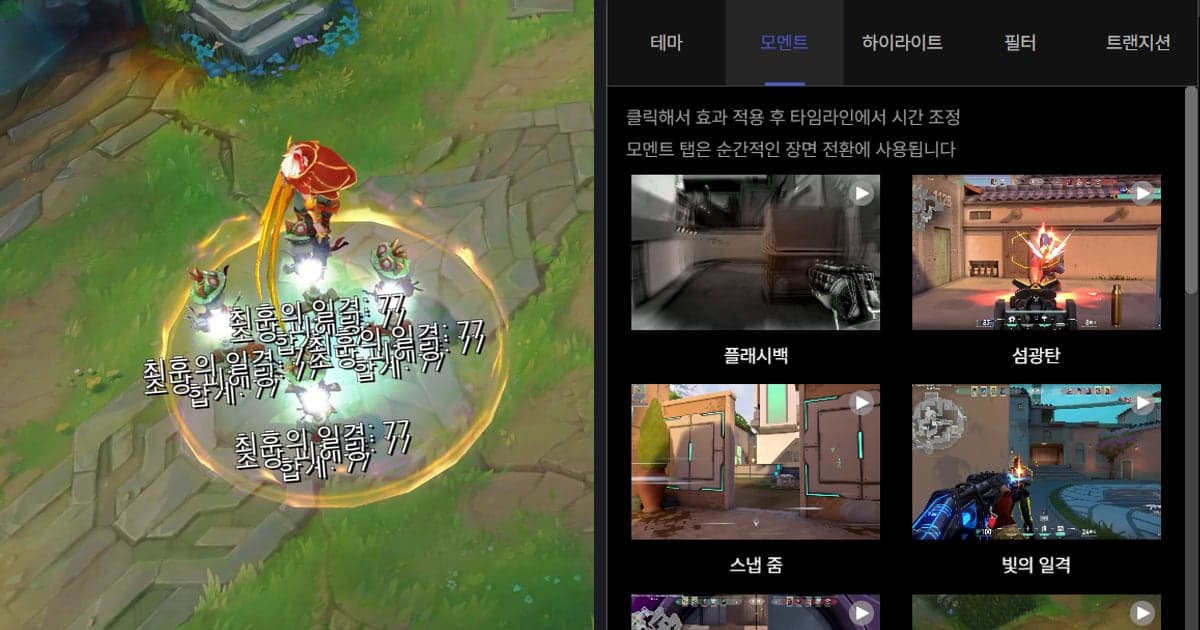
- 2Open the Moment tab — Click Effect in the studio menu and you will see the Theme, Moment, Highlight, Filter and Transition tabs. The shake-style effects sit in the Moment tab, which is described as being for instantaneous scene transitions.
- 3Click Shake Zoom or Handheld — Click Shake Zoom or Handheld. Nothing is added automatically; the effect applies the moment you click, so play the clip back and check that it suits the scene.
- 4Adjust the timing in the timeline — The panel hint says to click to apply the effect and then adjust the timing in the timeline. Line it up with the moment of the kill and keep only the stretch that needs the shake.
- 5Compare other Moment effects — Try Face Smash or Earthquake the same way and keep the one that fits the mood of the scene. Using one effect per scene makes it easier to compare how the kill reads.
- 6Polish and export — If needed, add text, music and volume changes from the menu, then download the result as mp4 or share it by link.
How each tool adds shake (editor rows use official documentation only)
| Tool | Method checked (editors: official docs) | Fits when |
|---|---|---|
| Premiere Pro (effect) | Open the Effects panel (Window > Effects), search for Camera Shake or Wiggle, drag it onto the clip, then tune it in the Effect Controls panel. Adobe describes Camera Shake as simulating handheld camera movement and Wiggle as randomized, jittery motion. | You want a shake look from a single effect |
| Premiere Pro (keyframes) | Select the clip, expand Motion (or Transform) in Effect Controls, click Toggle Animation on Position, Scale or Rotation, then move the playhead and change the value. | You want to set the direction and size of each jolt yourself |
| CapCut (PC) | Click the diamond icon beside Position, Scale, Rotation or Opacity in the right panel, move the playhead and adjust, and the in-between motion is generated. The guide checked here does not name a specific shake effect. | You prefer building the movement from keyframes |
| DaVinci Resolve | The diamond keyframe buttons in the Inspector animate a setting over the clip's duration, and the effects library at the top left lets you drag items onto the timeline. No shake-specific effect name is stated here. | You want to animate position or rotation by hand |
| DOR Studio | Effect > Moment tab > click Shake Zoom, Handheld, Face Smash or Earthquake, then adjust the timing in the timeline. | You want a named shake effect applied with a click |
Checklist for choosing which moment gets the shake
- Check that the kill is already clear without any shake. An effect is there to emphasize a moment that already reads well.
- Make sure you have not stacked shake-style effects on one scene. Pick either Shake Zoom or Handheld, not both.
- Play the shaking stretch back and confirm the enemy or your crosshair does not drift out of the frame.
- If you merged several clips, avoid giving every clip the same effect and keep it for the one scene you most want to stress.
- If you added text and music, play the clip from the start once more to see that the effect timing does not compete with them.
Recording and kill clips are automatic, the effect is one click
On Windows PC, DOR detects supported games and records the full match to mp4 automatically, and for seven games, Valorant, League of Legends, PUBG, FC Online, Fortnite, Counter-Strike and Overwatch, it also creates highlight clips such as kills on its own. Adding a shake is the step you choose afterwards. Once kill clips pile up, click a Moment effect only on the scene you want to stress. You can read how those clips are made in how DOR auto highlight clips work. On an NVIDIA graphics card, NVENC hardware encoding is used by default and game sound and microphone are recorded together, so the original you shake can already carry your own reaction on voice.
Official sources and what was checked
Effect and menu names in this post are as checked on October 6, 2026. Effect names follow the Premiere 26.0 documentation, and labels can differ by version. Confirm the wording for your version in the Adobe Premiere effects and transitions list, the CapCut keyframes guide and the DaVinci Resolve Edit page. The tabs and effect names for DOR Studio follow the labels shown in the studio itself.