The best OBS settings for a low-end PC are three changes: switch Video Encoder to a hardware option (NVENC, QSV, or AMD), lower Output (Scaled) Resolution to 1280×720 at 30 fps, and keep the quality value (CRF or CQ) at 23, the top of OBS's recommended 16–23 range, for the smallest files. The first two are the levers OBS's own documentation lists for cutting load; the third only controls file size. This guide uses the English menu names of OBS Studio 32.2.2 (version checked on the download page on September 16, 2026) and orders every setting by how much load it removes, so you know what to give up first and what to keep on an integrated or older GPU. For the bigger picture beyond OBS, see how to record games on a low-end PC.
The verdict: three changes and you are done
Here is the minimum. First, in Settings → Output with Output Mode set to Simple, set Recording Quality to High Quality, Medium File Size; only then does the Video Encoder list appear under Recording (it is a different dropdown from the Streaming one above it). In that list, if you see Hardware (NVENC, H.264), Hardware (QSV, H.264), or Hardware (AMD, H.264), pick it; if none appears, pick Software (x264 low CPU usage preset, increases file size). Second, in Settings → Video, set Output (Scaled) Resolution to 1280×720, Downscale Filter to Bilinear, and Common FPS Values to 30. Third, if you still need headroom and you are on x264, switch Output Mode to Advanced, set Video Encoder on the Recording tab to x264 instead of (Use stream encoder) so that Encoder Settings appears, and move CPU Usage Preset from veryfast to superfast or ultrafast. Leave the quality value (CRF for x264, CQ for NVENC and AMD, ICQ for QSV) at 23, the top of OBS's recommended 16–23 range: that gives the smallest files (for x264 the CRF field applies once Rate Control is set to CRF), but OBS's documentation does not list it as a load fix. If the "Encoding overloaded!" warning still shows up after that, follow the OBS encoding overloaded fix to work out which part is falling behind. And if all you want is a recording of your own matches in a supported game, there is a path with none of these settings: on a PC with an NVIDIA GPU, DOR records full matches automatically with NVENC once it detects a supported game, while an unsupported game or a scene you want to build with overlays and a webcam still calls for OBS.
Step by step: OBS 32 low-end recording setup
- 1Start from the Auto-Configuration Wizard — OBS shows the Auto-Configuration Wizard on first launch; if you skipped it, open Tools → Auto-Configuration Wizard. Choose the recording option and it picks starting values based on your hardware. On a weak PC treat those values as the ceiling, not the goal: the steps below trim from there.
- 2Change Recording Quality, then check the Video Encoder list for a hardware entry — Go to Settings → Output and make sure Output Mode is Simple. While Recording Quality is at its default, Same as stream, the Recording Video Encoder list is not shown at all, so first set Recording Quality to High Quality, Medium File Size, then open Video Encoder under Recording (a separate dropdown from the Streaming encoder above it). If Hardware (NVENC, H.264), Hardware (QSV, H.264), or Hardware (AMD, H.264) is listed, choose it. OBS's own documentation says hardware encoders are generally recommended for performance because they take the encoding workload off the CPU and hand it to a specialised part of the GPU. If no hardware entry is listed, you are limited to the Software (x264) options for now, so choose Software (x264 low CPU usage preset, increases file size).
- 3Leave Recording Format on the default Hybrid MP4 — When choosing Recording Quality, Indistinguishable Quality, Large File Size is the option OBS itself flags as a potential performance hit on older or weaker hardware, and Lossless Quality, Tremendously Large File Size writes around 7 GB per minute with a CPU encoder, so neither fits a low-end PC. Leave Recording Format on the OBS 32 default, Hybrid MP4 (.mp4): OBS's Hybrid MP4 documentation says it stays recoverable if the game or OBS crashes mid-recording, and it opens without a remux. Matroska Video (.mkv) is equally safe, but needs File → Remux Recordings if you want MP4.
- 4Drop to 720p and 30 fps in the Video tab — Open Settings → Video. Leave Base (Canvas) Resolution alone and lower Output (Scaled) Resolution to 1280×720; OBS does not generally recommend shrinking the base canvas, so only the output side changes. Set Downscale Filter to Bilinear (Fastest, but blurry if scaling), the lightest option by its own label. Set Common FPS Values to 30. As the OBS troubleshooting guide puts it, if 60 fps is not working, try 30: fewer frames means less rendering and encoding work, full stop.
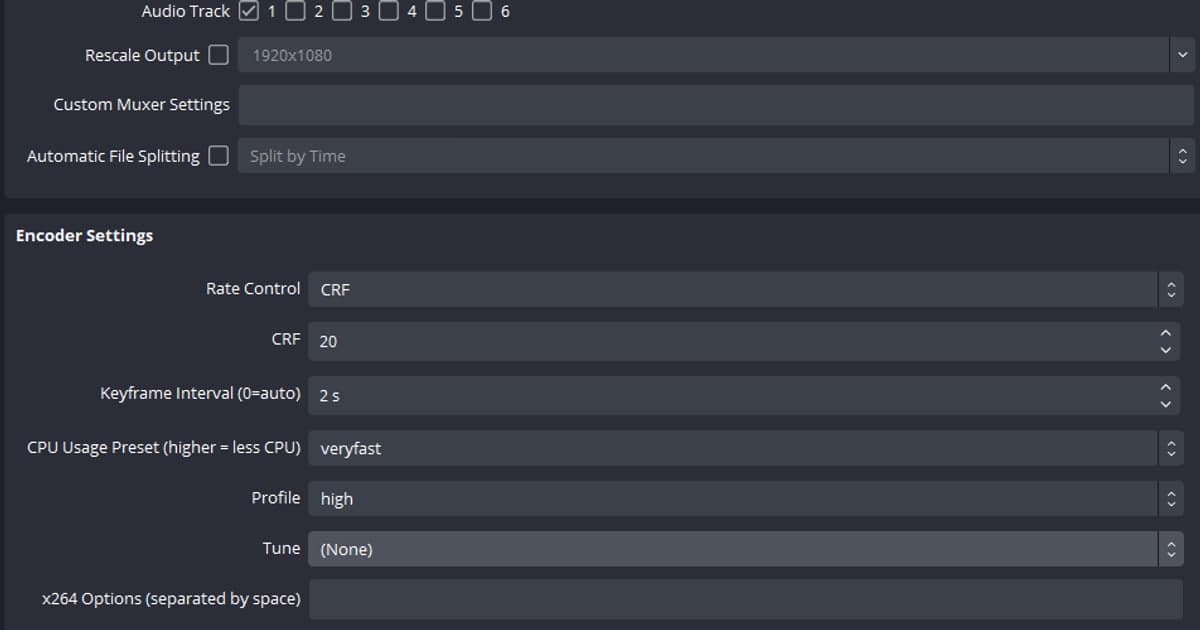
- 5Optional: tune the preset and quality value in Advanced mode — If Simple mode is not enough, switch Output Mode to Advanced, keep Type at Standard on the Recording tab, and set Video Encoder to x264 instead of the default (Use stream encoder); only then does the Encoder Settings group appear on the Recording tab. If you are on x264 because no hardware encoder exists, move CPU Usage Preset (higher = less CPU) from veryfast to superfast, then ultrafast if needed. OBS's own blog post "Streaming with x264" (2017, written for streaming) says to lower resolution and FPS first and only then the preset, so finish the previous step before touching this, and compare the Stats window before and after the switch to Advanced mode to confirm it actually helps. The quality value is a file-size control (for x264 the CRF field applies once Rate Control is set to CRF). As of September 16, 2026, OBS's recommended recording values are x264 with Rate Control CRF 16–23 and CPU Usage Preset veryfast, NVENC with CQP and CQ 16–23 at Preset P5, AMD with CQP 16–23 at Preset Quality, and QSV with ICQ 16–23 at TU4. OBS only documents that lower values mean higher quality and larger files, so keep 23, the top of the range, if disk space is tight, but do not expect it to reduce load.
- 6Simplify the scene and disable the preview — Every source costs resources. Keep a single Game Capture source in your recording scene and move webcam, browser sources, overlays, and filters into a separate scene collection or drop them. Right-click the preview and choose Disable Preview to stop OBS rendering the preview in its own window; OBS's documentation gives no figure for the saving, so compare the Stats window before and after and keep it off only if it helps. Enable Preview brings it back.
- 7Cap the game's frame rate and run OBS as administrator — OBS's official troubleshooting order starts with running OBS as administrator on Windows. Then, in the game's settings, cap the frame rate at your monitor's refresh rate or enable vertical sync; this frees processing power for OBS. Lowering the game's graphics settings and turning off Game DVR (the guide says Game Mode can stay on in recent Windows versions) are on the same list.
- 8Record a test and judge the limit with the Stats window — Record about five minutes of real gameplay, then open the Stats window. If Skipped frames due to encoding lag keeps climbing, the encoder is overloaded; if Frames missed due to rendering lag climbs, the GPU cannot keep up with rendering. If you are already at 720p30, a hardware encoder (or x264 ultrafast), one source, and a capped game frame rate, and either counter still rises steadily, that PC is at its limit for running the game and OBS together.
Priority table: what to reduce first in OBS on a weak PC
| Priority / setting | Change to | Effect and trade-off |
|---|---|---|
| 1. Video Encoder | A Hardware (NVENC/QSV/AMD, H.264) entry, if the list that appears after changing Recording Quality shows one | Moves encoding from the CPU to a dedicated GPU block. Older hardware encoders can look worse than x264 veryfast at the same file size |
| 2. Output (Scaled) Resolution | 1920×1080 → 1280×720 (Downscale Filter: Bilinear) | Fewer pixels for the GPU to render and encode. Image is less sharp |
| 3. FPS | 60 → 30 | Half the frames to render and encode. Motion looks less smooth |
| 4. x264 CPU Usage Preset (no hardware encoder) | veryfast (default) → superfast or ultrafast | Less CPU usage. Faster presets give lower quality at the same size |
| 5. Quality value (CRF / CQ / ICQ), file size only | 23, the top of the recommended 16–23 range | Smaller files. A higher value means lower quality (OBS documents only the quality and size effect, not a load reduction) |
| 6. Scene and preview | One Game Capture source, no extra filters; Disable Preview while recording | Less rendering work in the OBS window (OBS gives no figure for the saving, so check the Stats window). You cannot watch the capture inside OBS while it records |
| 7. Game frame rate | Cap it at your monitor's refresh rate or enable vertical sync | Frees processing power for OBS. Your game FPS gets a ceiling |
| Keep: Recording Format | The default Hybrid MP4 (.mp4) (Matroska Video (.mkv) also works) | Both stay recoverable after a crash per OBS's docs; Hybrid MP4 needs no remux |
Low-end checklist before you hit Start Recording
- Recording Quality is High Quality, Medium File Size and the Video Encoder list under Recording is visible
- Video Encoder shows a Hardware (NVENC/QSV/AMD, H.264) entry and it is selected; if none, Software (x264 low CPU usage preset, increases file size) is selected
- Output (Scaled) Resolution 1280×720, Downscale Filter Bilinear, Common FPS Values 30
- Recording Format is the default Hybrid MP4 (.mp4) (or Matroska Video (.mkv))
- In Advanced mode, any x264 CPU Usage Preset is superfast or faster; the quality value 23 is there for file size only
- The scene holds one Game Capture source and the preview is disabled while recording
- The game's frame rate is capped at the monitor refresh rate and OBS runs as administrator
If you only want automatic recording with zero settings: DOR
If the whole point of the setup above is to keep every match you play, there is a route that skips OBS settings entirely. DOR is a free Windows app: when a supported game such as League of Legends or VALORANT starts, it detects it, records the full match to mp4 with game audio and your microphone, and uses NVIDIA NVENC hardware encoding by default, so you never have to pick an encoder, resolution, or preset. For seven games, League of Legends, VALORANT, PUBG, FC Online, Fortnite, Counter-Strike, and Overwatch, it also cuts kills and similar moments into clips on its own; DOR's automatic highlight clips explains how that works. The boundary is just as clear. We have not verified how DOR encodes on a PC without an NVIDIA GPU, it does not record games outside its supported list, and scenes that mix a webcam, overlays, and several sources, or fine-grained quality tuning, remain OBS territory. On a weak PC with a supported game and an NVIDIA GPU, leaving DOR on is the honest shortcut; in every other case, use the OBS settings in this guide.
Official sources
Menu names come from the OBS Studio 32.2.2 English UI and every number was checked against OBS's official documentation on September 16, 2026. The troubleshooting order and the case for lowering resolution and FPS are in the OBS encoding performance troubleshooting guide; the hardware encoder recommendation and minimum GPU generations are in the OBS hardware encoding article; the CRF/CQ 16–23 range and preset recommendations are in the OBS advanced recording settings guide. The crash-recovery behaviour of Hybrid MP4 is described in the Hybrid MP4 article of the same knowledge base. These values can change when the documents are revised, so open the originals before you apply them.