The fastest way to get a gaming video out of Premiere Pro at 1080p 60fps for YouTube takes two moves: drag the recording from the Project panel onto the New Item icon so the sequence matches the source, then export with File > Export > Media (Ctrl + M), Format H.264 and the Match Source - Adaptive High Bitrate preset. As of September 16, 2026, the current desktop release is Adobe Premiere 26.5.1, and Adobe now calls the product Adobe Premiere rather than Premiere Pro; this guide keeps the name most people search for but uses the labels from Adobe's live help pages. If you recorded at 1080p and 60 or 59.94fps in OBS, the NVIDIA app or DOR, the job is to match the sequence to the file and push the export bitrate above YouTube's recommendation rather than to re-invent the settings. Why the bitrate needs to be that number is covered in the game recording bitrate guide; this article stays on what to click inside Premiere.
Bottom line: match the source on the way in, match the source on the way out
Four actions cover it. First, right-click the recording in the Project panel and open Properties to note the frame rate (59.94 or 60) and Image Size. Second, drag that clip onto the New Item icon at the bottom of the Project panel so Premiere builds a sequence that matches the source; the Timebase locks once the sequence exists, so this is the moment to get it right. Third, after cutting, press Ctrl + M, pick Media File or YouTube as the destination, set Format to H.264 and Preset to Match Source - Adaptive High Bitrate. Fourth, switch Bitrate Settings to VBR 2 Pass, confirm Target Bitrate [Mbps] is at or above YouTube's 12 Mbps for 1080p60 SDR and that audio is AAC, 48 kHz, Stereo, then click Export. If the upload still looks soft, the cause is usually on the upload side rather than in Premiere, so read how to upload game videos without losing quality before changing anything else. And if your goal stops at trimming supported-game recordings for YouTube or Discord, DOR saves mp4 automatically and handles trimming, merging, aspect ratio, text and music in its browser studio, so there is no sequence or export step at all; Premiere is the tool when you need precise color, multicam, keyframes or plugins.
Sequence, edit, export: the order that works
- 1Check the source frame rate and Image Size — Import the recording, right-click it in the Project panel and open Properties. Write down the frame rate (59.94 or 60) and the Image Size (1920×1080 for a 1080p capture). If OBS made the file, these values come from Settings > Video > FPS and Base (Canvas) Resolution / Output (Scaled) Resolution. Adobe states that Premiere performs best when the sequence settings match the parameters of the assets in it, so this number drives everything that follows. If the capture uses a variable frame rate, audio can drift during editing; if playback disagrees with what Properties shows, treat that file separately before you build the timeline.
- 2Create a matching sequence with the New Item icon — Drag the clip onto the New Item icon at the bottom of the Project panel. In Adobe's own words, a new sequence is created automatically with the appropriate resolution and frame rate to match the source footage, so a 1080p 60fps recording gives you a 1920×1080 sequence at 60 (or 59.94) without touching a dialog. To add the clip to a sequence that already exists, drag it into that sequence on the timeline instead, but remember that settings like Timebase lock at creation, so check them before mixing sources.
- 3Values for a manual sequence — The New Sequence dialog has three tabs: Sequence Presets, General and Tracks. If the preset categories mean nothing to you, use the General tab: Editing Mode Custom, Timebase equal to the source value from Properties (59.94 or 60), Frame Size 1920×1080, Pixel Aspect Ratio Square Pixels, Fields No Fields (Progressive Scan). To revisit a sequence later, use Sequence > Sequence Settings or right-click the sequence in the Project panel and choose Sequence Settings. Avoid changing the clip side with Modify > Interpret Footage > Assume this frame rate: it changes the audio as well and scales the duration proportionally, which is rarely what a gameplay recording needs.
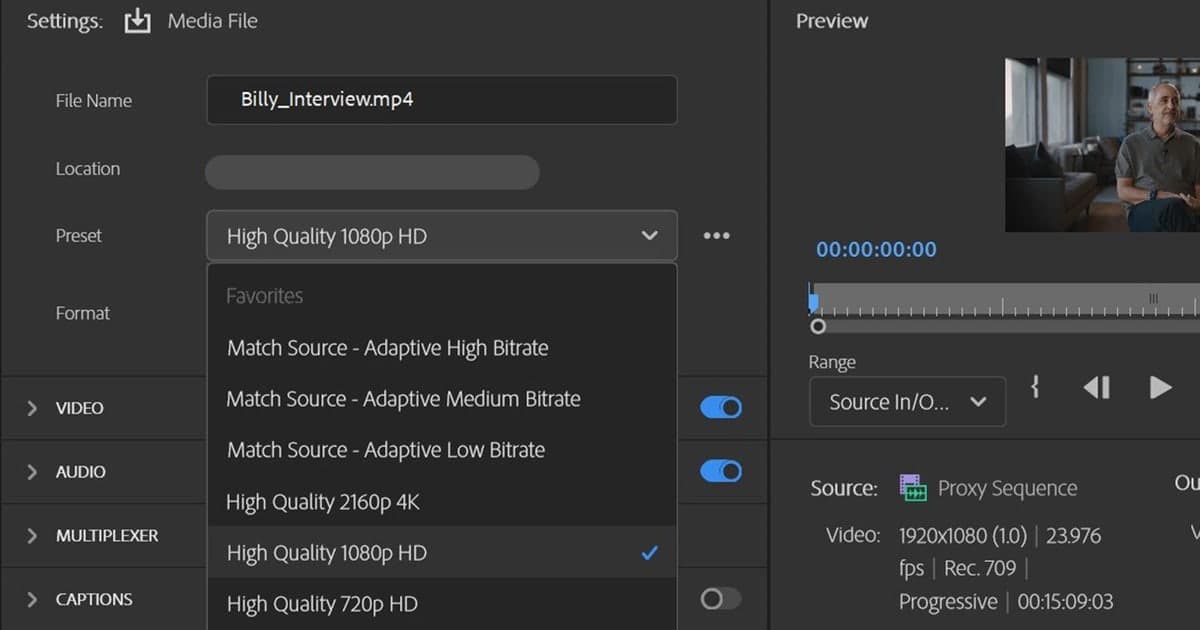
- 4Open Export and choose destination, format and preset — Select the sequence on the timeline and choose File > Export > Media or press Ctrl + M. In the left column pick the destination: Media File for a local file, or toggle YouTube and fill in title, description and tags to publish directly. Set Format to H.264, which Adobe recommends for most online videos. Set Preset to Match Source - Adaptive High Bitrate; it matches frame size and frame rate to the sequence automatically. Adobe recommends exactly this pairing for direct social publishing too, and More presets... in the Preset dropdown is where platform-specific presets live if you want to browse them.
- 5Review video encoding and bitrate — In the Video section confirm Frame Size is Full HD (1920×1080) and Frame Rate equals the sequence. Adobe warns that a frame rate different from the source can produce unwanted motion artifacts, and Time Interpolation (Frame Sampling, Frame Blending, Optical Flow) only kicks in when the rates differ. Field Order Progressive, Profile High (turn on Match Source if unsure), and leave Performance at its default hardware encoding. Under Bitrate Settings choose VBR 2 Pass: it reads the file twice and takes longer, but per Adobe it often produces higher-quality output. Check Target Bitrate [Mbps] is at least YouTube's 12 Mbps for 1080p60 SDR, or 8 Mbps for a 30fps recording.
- 6Confirm the audio settings — Audio Codec AAC; Sample Rate as recorded, per Adobe (YouTube recommends 48 kHz); Channels Stereo; Bitrate [kbps] set to the highest value in the dropdown (YouTube recommends 384 kbps for stereo). If game sound and microphone were captured to one track, export as is; if they arrived on separate tracks, balance their volume on the timeline first.
- 7Export, or use Quick Export — Click Export to render in Premiere, or Send to Media Encoder to keep editing while it encodes in the background. If you never want to see these settings again, the Quick Export icon in the upper-right corner runs file name and location, Preset, Export, and More presets opens the Preset Manager for favorites. Leave Use Previews unchecked in the General section, because exporting from preview files can affect quality. Finally, import the finished file back into the Project panel and open Properties to confirm frame rate and Image Size match the sequence before uploading.
Sequence and export values for 1080p 60fps YouTube (verified September 16, 2026)
| Setting | Value | Why / source |
|---|---|---|
| Sequence Frame Size | 1920×1080 | YouTube's recommended 1080p resolution (16:9); same as the source Image Size |
| Sequence Timebase | Same as the source frame rate in Properties (59.94 or 60) | Adobe: Premiere performs best when sequence settings match the assets; Timebase locks after creation |
| Pixel Aspect Ratio | Square Pixels | Adobe: computer-generated graphics use square pixels |
| Fields | No Fields (Progressive Scan) | Game capture is progressive; YouTube recommends progressive scan |
| Export Format | H.264 | Adobe: recommended for most online videos |
| Preset | Match Source - Adaptive High Bitrate | Adobe: quick, high-quality export that auto-matches frame size and frame rate |
| Profile / Field Order | High / Progressive | Adobe: High is supported by most HD devices; YouTube recommends High Profile, progressive |
| Bitrate Settings | VBR 2 Pass, Target Bitrate 12 Mbps or higher | Adobe: 2 Pass often produces higher-quality output; YouTube 1080p60 SDR recommends 12 Mbps (8 Mbps at 30fps) |
| Audio | AAC, Sample Rate 48 kHz, Stereo, highest Bitrate [kbps] | YouTube recommends AAC-LC 48 kHz Stereo 384 kbps; Adobe: keep the recorded sample rate |
| Performance | Leave the default (hardware encoding) | Adobe: falls back to software encoding automatically if unsupported |
Pre-export checklist
- Source frame rate in Properties (59.94 or 60) equals the sequence Timebase
- Sequence is 1920×1080, Square Pixels, No Fields (Progressive Scan)
- Format H.264 and Preset Match Source - Adaptive High Bitrate
- Profile High, Field Order Progressive, Performance left at default
- Bitrate Settings VBR 2 Pass, Target Bitrate 12 Mbps or higher for 1080p60
- Audio Codec AAC, Sample Rate 48 kHz, Channels Stereo, highest Bitrate [kbps]
- Use Previews unchecked, and the exported file's Properties match the sequence
The path that skips every setting above: DOR
Everything above assumes you will load a recording into Premiere and re-encode it to YouTube's spec. If your goal is only to cut supported-game matches for YouTube or Discord, DOR (a free Windows app) removes that assumption. It detects supported games, records full matches to mp4 with NVIDIA NVENC hardware encoding by default, and for games with automatic kill clips such as Valorant, League of Legends, PUBG, FC Online, Fortnite, Counter-Strike and Overwatch it cuts highlights into the library on its own (other supported games get full-match recording only). The trim tool in the library sets a start and end, offers 16:9, 9:16 or 1:1, and shares a dor.gg link; the browser studio trims, merges clips, switches platform aspect ratios, adds text, background music and volume changes, then hands you an mp4 download or a share link (clips of 3 seconds or more, files up to 500 MB). There is no sequence to configure and no export dialog, and the DOR browser clip editor guide walks through it. The honest boundary: precise color grading, multicam, keyframe animation, multitrack audio, plugins and automatic captions are Premiere territory, which is what this article is for.
Sources and verification date
Menu paths and preset names come from Adobe's help page Export video (Adobe Premiere), the version number from the Adobe Premiere release notes, and the bitrate, audio and frame-rate figures from YouTube's recommended upload encoding settings, all checked on September 16, 2026. Adobe's pages label the Performance default inconsistently, so this article says to leave the default rather than quote one name. Preset names and recommended bitrates change over time, so re-check the links above before a big upload.